环境搭建
0x00:前言
这一系列文章是记录我在Windows内核漏洞学习的过程,我把他们整合成了一篇,覆盖了大部分漏洞的类型,既然是第0篇,那肯定是着重点放在环境的搭建和介绍,我的打算是先把HEVD中的大部分漏洞走一遍,实验环境是在Windows 7 x86 sp1,你需要安装的主要内容如下:
0x01:环境安装
下面我简要说一下环境的配置,配置环境是一件麻烦的事情,不同的时期会有不同的新工具和版本,我们需要的东西只是一个虚拟机,调试器和驱动加载工具,所以如果下面的方法你不能得到理想的效果,可以参考许多其他最新的文章
windbg
我们第一步需要准备的就是一个Windows7 x86 sp1的虚拟机了,虚拟机就不多解释如何安装了,当你安装好了虚拟机之后你还需要安装一个内核调试工具windbg,如果你是一个 pwn 选手,那你肯定熟悉 gdb 调试,如果你是 reverse 选手,那你肯定熟悉 OD 调试,但是我们现在是对内核调试,需要用windbg调试,建议使用windbg官方预览版,进去之后点击获取就会在微软官方应用商城下载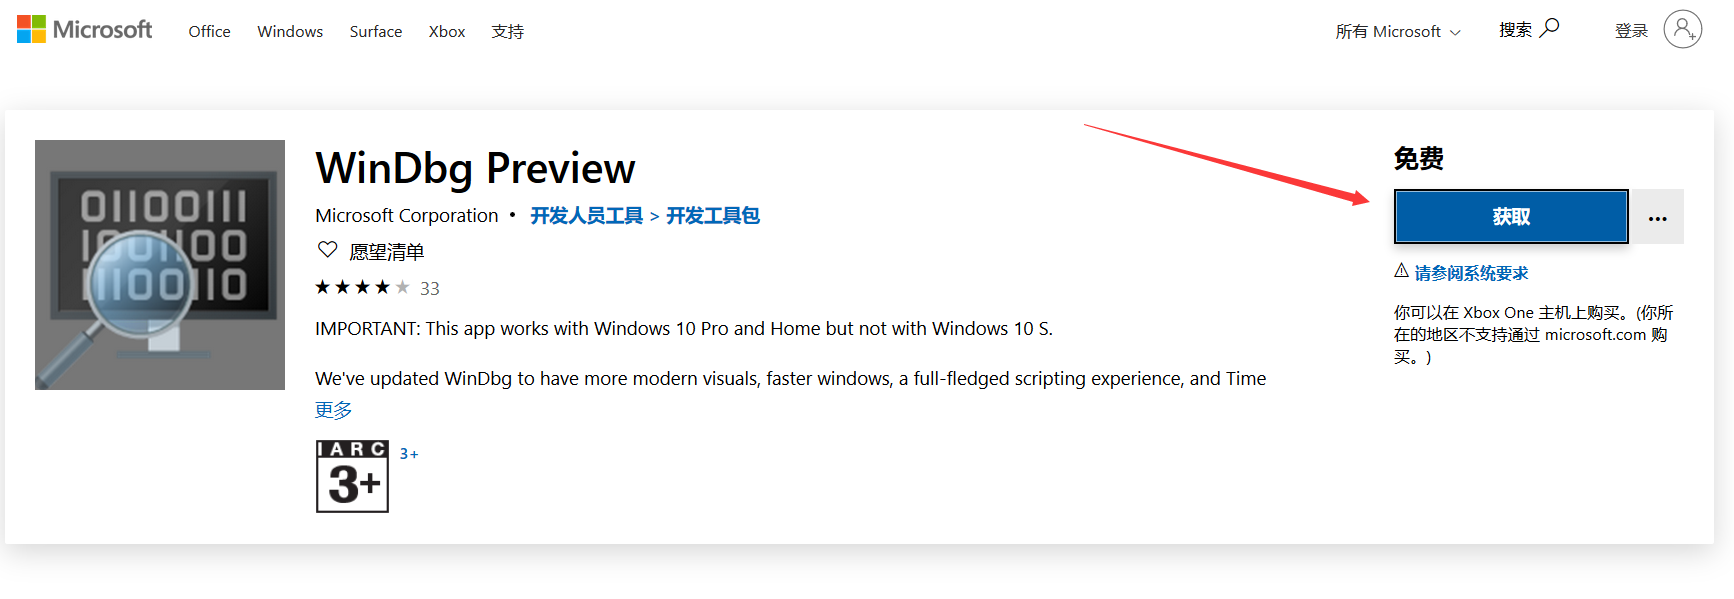
下载之后我们需要对符号路径进行设置,这是我自己的设置,根据自己HEVD的路径不同,选择填入自己的路径
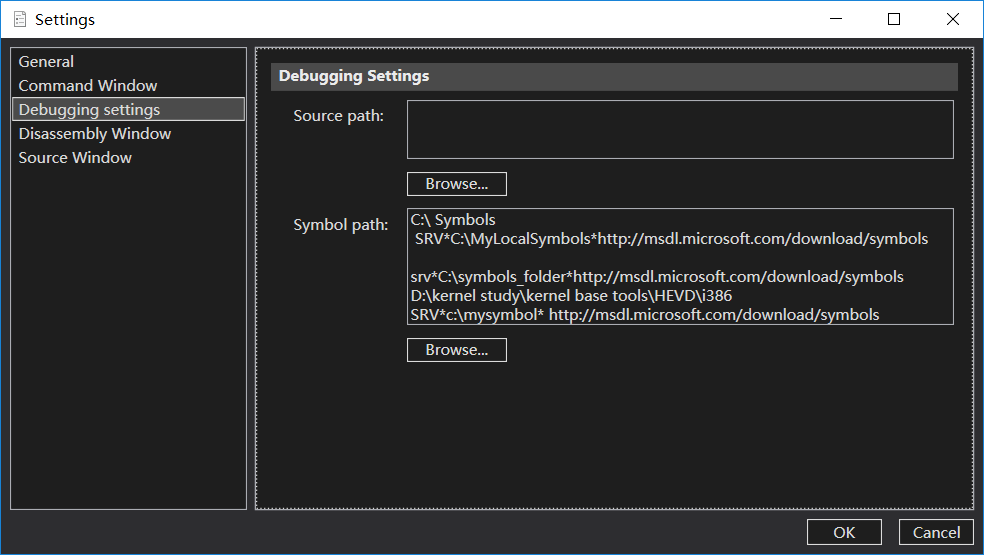
下面是我的路径信息
1 | C:\ Symbols |
VirtualKD
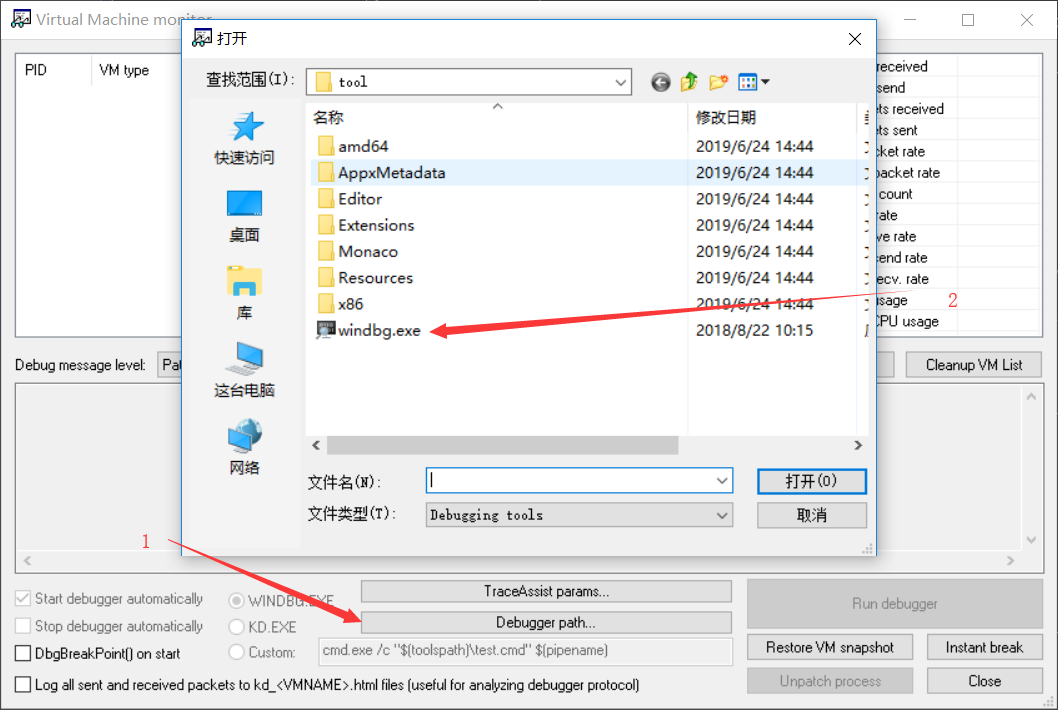
VirtualKD 在这里下载,下载完之后我们打开 Virtual Machine monitor ,点击 Debugger path 之后选择我们调试器的路径就可以用了
双击调试的过程动态图在这里
HEVD + OSR loader
安装之后按如下操作即可加载HEVD驱动,开启服务
准备就绪
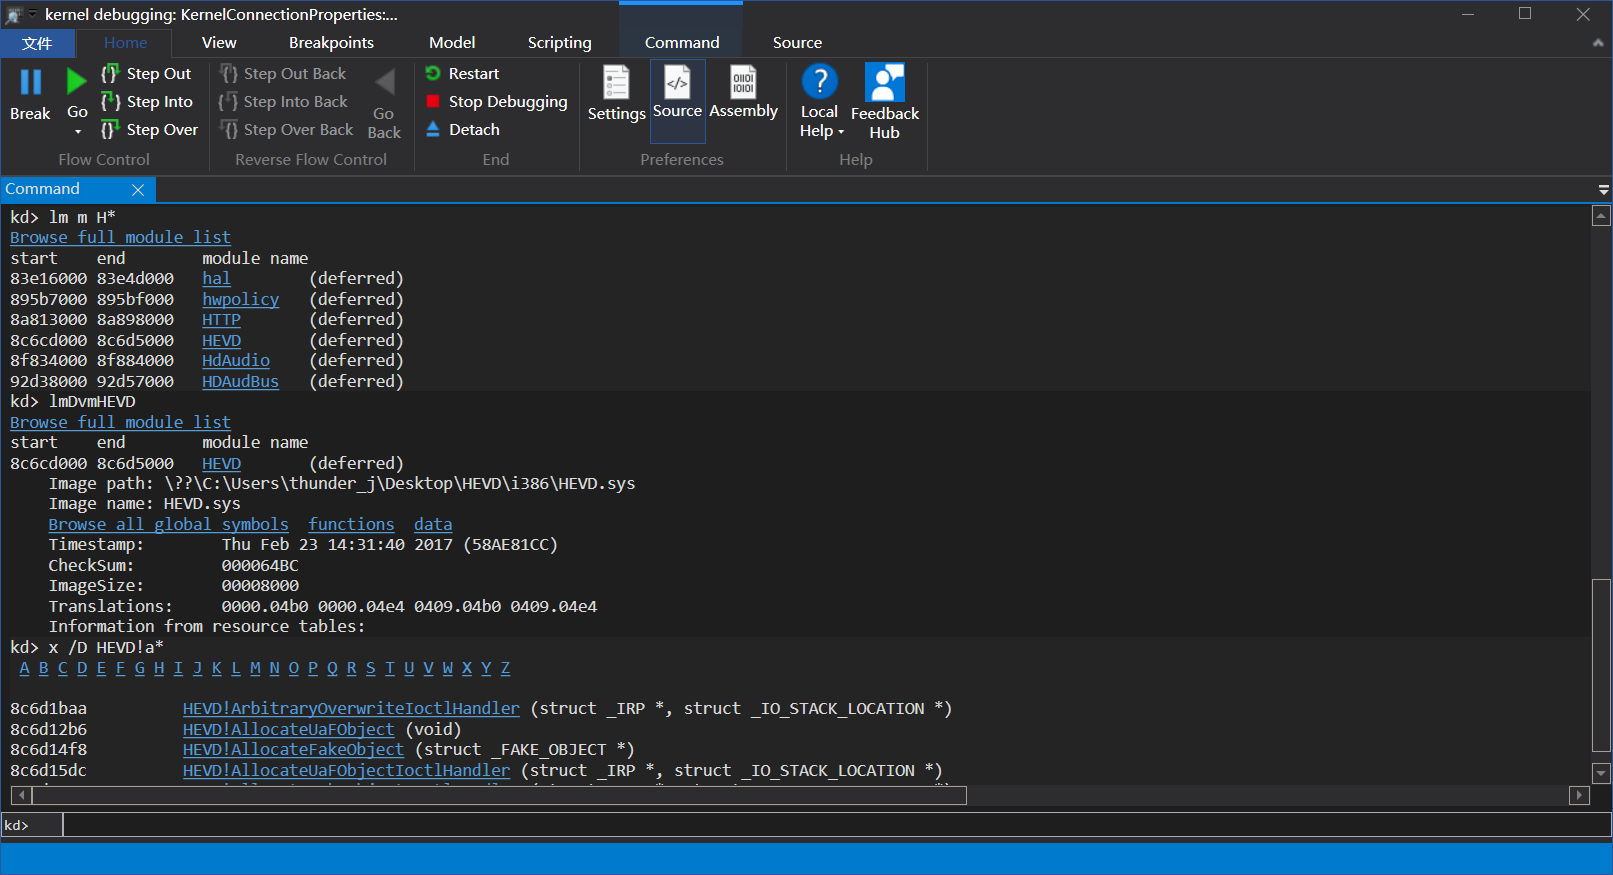
当上面的步骤都做完时,用windbg打印lm m H*命令,点击蓝色的HEVD,再点击蓝色的Browse all global symbols,能解析出地址就说明一切准备就绪,如下图
0x02:后续
后面的文章我们会用HEVD来构造各种漏洞环境,依次在Windows 7 x86 sp1下感受Windows的pwn和Linux的有何区别,如果你不知道该准备些什么知识的时候,试着去了解一些驱动相关的知识,当然逆向的基础不能少,你需要掌握一些基本的汇编语言,准备的过程可能会出现许许多多奇怪的问题,这个时候就需要你去慢慢百度解决了,一定要有耐心,还有一些基础的工具你也需要提前准备好(IDA,VS,源码查看工具等等)
0x03:UAF
这是我总结的Windows kernel exploit系列的第一部分,前一篇我们讲了环境的配置,这一篇从简单的UAF入手,第一篇我尽量写的详细一些,实验环境是Windows 7 x86 sp1,研究内核漏洞是一件令人兴奋的事情,希望能通过文章遇到更多志同道合的朋友,看此文章之前你需要有以下准备:
- Windows 7 x86 sp1虚拟机
- 配置好windbg等调试工具,建议配合VirtualKD使用
- HEVD+OSR Loader配合构造漏洞环境
0x01:漏洞原理
提权原理
首先我们要明白一个道理,运行一个普通的程序在正常情况下是没有系统权限的,但是往往在一些漏洞利用中,我们会想要让一个普通的程序达到很高的权限就比如系统权限,下面做一个实验,我们在虚拟机中用普通权限打开一个cmd然后断下来,用!dml_proc命令查看当前进程的信息
1 | kd> !dml_proc |
我们可以看到System的地址是 865ce8a8 ,cmd的地址是 87040ca0 ,我们可以通过下面的方式查看地址中的成员信息,这里之所以 +f8 是因为token的位置是在进程偏移为 0xf8 的地方,也就是Value的值,那么什么是token?你可以把它比做等级,不同的权限等级不同,比如系统权限等级是5级(最高),那么普通权限就好比是1级,我们可以通过修改我们的等级达到系统的5级权限,这也就是提权的基本原理,如果我们可以修改进程的token为系统的token,那么就可以提权成功,我们手动操作一次下面是修改前token值的对比
1 | kd> dt nt!_EX_FAST_REF 865ce8a8+f8 |
我们通过ed命令修改cmd token的值为system token
1 | kd> ed 87040ca0+f8 8a201275 |
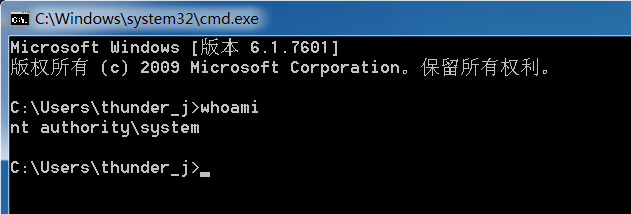
用whoami命令发现权限已经变成了系统权限
我们将上面的操作变为汇编的形式如下
1 | void ShellCode() |
解释一下上面的代码,fs寄存器在Ring0中指向一个称为KPCR的数据结构,即FS段的起点与 KPCR 结构对齐,而在Ring0中fs寄存器一般为0x30,这样fs:[124]就指向KPRCB数据结构的第四个字节。由于 KPRCB 结构比较大,在此就不列出来了。查看其数据结构可以看到第四个字节指向CurrentThead(KTHREAD类型)。这样fs:[124]其实是指向当前线程的_KTHREAD
1 | kd> dt nt!_KPCR |
再来看看_EPROCESS的结构,+0xb8处是进程活动链表,用于储存当前进程的信息,我们通过对它的遍历,可以找到system的token,我们知道system的PID一直是4,通过这一点我们就可以遍历了,遍历到系统token之后替换就行了
1 | kd> dt nt!_EPROCESS |
UAF原理
如果你是一个pwn选手,那么肯定很清楚UAF的原理,简单的说,Use After Free 就是其字面所表达的意思,当一个内存块被释放之后再次被使用。但是其实这里有以下几种情况:
- 内存块被释放后,其对应的指针被设置为 NULL , 然后再次使用,自然程序会崩溃。
- 内存块被释放后,其对应的指针没有被设置为 NULL ,然后在它下一次被使用之前,没有代码对这块内存块进行修改,那么程序很有可能可以正常运转。
- 内存块被释放后,其对应的指针没有被设置为 NULL,但是在它下一次使用之前,有代码对这块内存进行了修改,那么当程序再次使用这块内存时,就很有可能会出现奇怪的问题。
而我们一般所指的 Use After Free 漏洞主要是后两种。此外,我们一般称被释放后没有被设置为 NULL 的内存指针为 dangling pointer。类比Linux的内存管理机制,Windows下的内存申请也是有规律的,我们知道ExAllocatePoolWithTag函数中申请的内存并不是胡乱申请的,操作系统会选择当前大小最合适的空闲堆来存放它。如果你足够细心的话,在源码中你会发现在UseUaFObject中存在g_UseAfterFreeObject->Callback();的片段,如果我们将Callback覆盖为shellcode就可以提权了
1 | typedef struct _USE_AFTER_FREE { |
0x02:漏洞利用
利用思路
如果我们一开始申请堆的大小和UAF中堆的大小相同,那么就可能申请到我们的这块内存,假如我们又提前构造好了这块内存中的数据,那么当最后释放的时候就会指向我们shellcode的位置,从而达到提取的效果。但是这里有个问题,我们电脑中有许许多多的空闲内存,如果我们只构造一块假堆,我们并不能保证刚好能够用到我们的这块内存,所以我们就需要构造很多个这种堆,换句话说就是堆海战术吧,如果你看过0day安全这本书,里面说的堆喷射也就是这个原理。
利用代码
根据上面我们已经得到提权的代码,相当于我们只有子弹没有枪,这样肯定是不行的,我们首先伪造环境
1 | typedef struct _FAKE_USE_AFTER_FREE |
接下来我们进行堆喷射
1 | for (int i = 0; i < 5000; i++) |
你可能会疑惑上面的IO控制码是如何得到的,这是通过逆向分析IrpDeviceIoCtlHandler函数得到的,我们通过DeviceIoControl函数实现对驱动中函数的调用,下面原理相同
1 | // 调用 UseUaFObject() 函数 |
最后我们需要一个函数来调用 cmd 窗口检验我们是否提权成功
1 | static VOID CreateCmd() |
上面是主要的代码,详细的代码参考这里,最后提权成功
0x03:补丁思考
对于 UseAfterFree 漏洞的修复,如果你看过我写的一篇pwn-UAF入门的话,补丁的修复就很明显了,我们漏洞利用是在 free 掉了对象之后再次对它的引用,如果我们增加一个条件,判断对象是否为空,如果为空则不调用,那么就可以避免 UseAfterFree 的发生,而在FreeUaFObject()函数中指明了安全的措施,我们只需要把g_UseAfterFreeObject置为NULL
1 |
|
下面是在UseUaFObject()函数中的修复方案:
1 | if(g_UseAfterFreeObject != NULL) |
0x04:Stack-Overflow
这是 Windows kernel exploit 系列的第二部分,前一篇我们讲了UAF的利用,这一篇我们通过内核空间的栈溢出来继续深入学习 Windows Kernel exploit ,看此文章之前你需要有以下准备:
- Windows 7 x86 sp1虚拟机
- 配置好windbg等调试工具,建议配合VirtualKD使用
- HEVD+OSR Loader配合构造漏洞环境
0x01:漏洞原理
栈溢出原理
栈溢出是系列漏洞中最为基础的漏洞,如果你是一个 pwn 选手,第一个学的就是简单的栈溢出,栈溢出的原理比较简单,我的理解就是用户对自己申请的缓冲区大小没有一个很好的把控,导致缓冲区作为参数传入其他函数的时候可能覆盖到了不该覆盖的位置,比如 ebp,返回地址等,如果我们精心构造好返回地址的话,程序就会按照我们指定的流程继续运行下去,原理很简单,但是实际用起来并不是那么容易的,在Windows的不断更新过程中,也增加了许多对于栈溢出的安全保护机制。
漏洞点分析
我们在IDA中打开源码文件StackOverflow.c源码文件这里下载查看一下主函数TriggerStackOverflow,这里直接将 Size 传入memcpy函数中,未对它进行限制,就可能出现栈溢出的情况,另外,我们可以发现 KernelBuffer 的 Size 是 0x800
1 | int __stdcall TriggerStackOverflow(void *UserBuffer, unsigned int Size) |
我们现在差的就是偏移了,偏移的计算是在windbg中调试得到的,我们需要下两处断点来找偏移,第一处是在TriggerStackOverflow函数开始的地方,第二处是在函数中的memcpy函数处下断点
1 | kd> bl //查看所有断点 |
上面的第一处断点可以看到返回地址是0x91a03ad4
1 | kd> g |
上面的第二处断点可以看到0x91a032b4是我们memcpy的第一个参数,也就是KernelBuffer,我们需要覆盖到返回地址也就是偏移为 0x820
1 | hex(0x91a03ad4-0x91a032b4) |
0x02:漏洞利用
利用思路
知道了偏移,我们只需要将返回地址覆盖为我们的shellcode的位置即可提权,提权的原理我在第一篇就有讲过,需要的可以参考我的第一篇,只是这里提权的代码需要考虑到栈的平衡问题,在TriggerStackOverflow函数开始的地方,我们下断点观察发现,ebp的值位置在91a3bae0,也就是值为91a3bafc
1 | kd> g |
当我们进入shellcode的时候,我们的ebp被覆盖为了0x41414141,为了使堆栈平衡,我们需要将ebp重新赋值为97a8fafc
1 | kd> |
利用代码
利用思路中,我们介绍了为什么要堆栈平衡,下面是具体的shellcode部分
1 | VOID ShellCode() |
构造并调用shellcode部分
1 | char buf[0x824]; |
具体的代码参考这里,最后提权成功
0x03:补丁思考
我们先查看源文件 StackOverflow.c 中补丁的措施,区别很明显,不安全版本的RtlCopyMemory函数中的第三个参数没有进行控制,直接将用户提供的 Size 传到了函数中,安全的补丁就是对RtlCopyMemory的参数进行严格的设置
1 |
|
0x05:Write-What-Where
这是 Windows kernel exploit 系列的第三部分,前一篇我们讲了内核栈溢出的利用,这一篇我们介绍任意内存覆盖漏洞,也就是 Write-What-Where 漏洞,和前面一样,看此文章之前你需要有以下准备:
- Windows 7 x86 sp1虚拟机
- 配置好windbg等调试工具,建议配合VirtualKD使用
- HEVD+OSR Loader配合构造漏洞环境
0x01:漏洞原理
任意内存覆盖漏洞
从 IDA 中我们直接分析HEVD.sys中的TriggerArbitraryOverwrite函数,乍一看没啥毛病,仔细分析发现v1,v2这俩指针都没有验证地址是否有效就直接拿来用了,这是内核态,给点面子好吧,胡乱引用可以要蓝屏的(严肃
1 | int __stdcall TriggerArbitraryOverwrite(_WRITE_WHAT_WHERE *UserWriteWhatWhere) |
我们从ArbitraryOverwrite.c源码文件入手,直接定位关键点
1 |
|
如果你不清楚ProbeForRead函数的话,这里可以得到很官方的解释(永远记住官方文档是最好的),就是检查用户模式缓冲区是否实际驻留在地址空间的用户部分中,并且正确对齐,相当于检查一块内存是否正确。
1 | void ProbeForRead( |
和我们设想的一样,从刚才上面的对比处可以很清楚的看出,在安全的条件下,我们在使用两个指针的时候对指针所指向的地址进行了验证,如果不对地址进行验证,在内核空间中访问到了不该访问的内存那很可能就会蓝屏,通过这一点我们就可以利用,既然是访问内存,那我们让其访问我们shellcode的位置即可达到提权的效果,那么怎么才能访问到我们的shellcode呢?
0x02:漏洞利用
利用原理
控制码
知道了漏洞的原理之后我们开始构造exploit,前面我们通过分析IrpDeviceIoCtlHandler函数可以逆向出每个函数对应的控制码,然而这个过程我们可以通过分析HackSysExtremeVulnerableDriver.h自己计算出控制码,源码中的定义如下
1 |
下面解释一下如何计算控制码,CTL_CODE这个宏负责创建一个独特的系统I/O(输入输出)控制代码(IOCTL),计算公式如下
1 |
|
通过python我们就可以计算出控制码(注意对应好位置)
1 | hex((0x00000022 << 16) | (0x00000000 << 14) | (0x802 << 2) | 0x00000003) |
因为WRITE_WHAT_WHERE结构如下,一共有8个字节,前四个是 what ,后四个是 where ,所以我们申请一个buf大小为8个字节传入即可用到 what 和 where 指针
1 | typedef struct _WRITE_WHAT_WHERE { |
下面我们来测试一下我们的猜测是否正确
1 |
|
在 windbg 中如果不能显示出 dbgprint 中内容的话输入下面的这条命令即可显示
1 | ed nt!Kd_DEFAULT_Mask 8 |
我们运行刚才生成的程序,如我们所愿,这里已经成功调用了ArbitraryOverwriteIoctlHandler函数并且修改了 What 和 Where 指针
1 | kd> ed nt!Kd_DEFAULT_Mask 8 |
当然我们不能只修改成0x41414141,我们所希望的是把what指针覆盖为shellcode的地址,where指针修改为能指向shellcode地址的指针
Where & What 指针
这里的where指针我们希望能够覆盖到一个安全可靠的地址,我们在windbg中反编译一下NtQueryIntervalProfile+0x62这个位置
1 | kd> u nt!NtQueryIntervalProfile+0x62 |
上面可以发现,0x84159ed6这里会调用到一个函数KeQueryIntervalProfile,我们继续跟进
1 | 2: kd> u KeQueryIntervalProfile |
上面的0x840cc438处会有一个指针数组,这里就是我们shellcode需要覆盖的地方,为什么是这个地方呢?这是前人发现的,这个函数在内核中调用的很少,可以安全可靠地覆盖,而不会导致计算机崩溃,对于初学者而言就把这个地方当公式用吧,下面简单看一下HalDispatchTable这个内核服务函数指针表,结构如下
1 | HAL_DISPATCH HalDispatchTable = { |
我们需要很清楚的知道,我们刚才在找什么,我们就是在找where指针的位置,所以我们只需要把where的位置放在HalDispatchTable+0x4处就行了,而what指针我们希望的是存放shellcode的位置
- what -> &shellcode
- where -> HalDispatchTable+0x4
利用代码
上面我们解释了where和what指针的原理,现在我们需要用代码来实现上面的过程,我们主要聚焦点在where指针上,我们需要找到HalDispatchTable+0x4的位置,我们大致分一下流程:
- 找到 ntkrnlpa.exe 在 kernel mode 中的基地址
- 找到 ntkrnlpa.exe 在 user mode 中的基地址
- 找到 HalDispatchTable 在 user mode 中的地址
- 计算 HalDispatchTable+0x4 的地址
ntkrnlpa.exe 在 kernel mode 中的基地址
我们用EnumDeviceDrivers函数检索系统中每个设备驱动程序的加载地址,然后用GetDeviceDriverBaseNameA函数检索指定设备驱动程序的基本名称,以此确定 ntkrnlpa.exe 在内核模式中的基地址,当然我们需要包含文件头Psapi.h
1 | LPVOID NtkrnlpaBase() |
ntkrnlpa.exe 在 user mode 中的基地址
我们用函数LoadLibrary将指定的模块加载到调用进程的地址空间中,获取它在用户模式下的基地址
1 | HMODULE hUserSpaceBase = LoadLibrary("ntkrnlpa.exe"); |
HalDispatchTable 在 user mode 中的地址
我们用GetProcAddress函数返回ntkrnlpa.exe中的导出函数HalDispatchTable的地址
1 | PVOID pUserSpaceAddress = GetProcAddress(hUserSpaceBase, "HalDispatchTable"); |
计算 HalDispatchTable+0x4 的地址
如果你是一个pwn选手的话,你可以把这里的计算过程类比计算函数中的偏移,实际地址 = 基地址 + 偏移,最终我们确定下了HalDispatchTable+0x4的地址
1 | DWORD32 hal_4 = (DWORD32)pNtkrnlpaBase + ((DWORD32)pUserSpaceAddress - (DWORD32)hUserSpaceBase) + 0x4; |
我们计算出了where指针的位置,what指针放好shellcode的位置之后,我们再次调用NtQueryIntervalProfile内核函数就可以实现提权,但是这里的NtQueryIntervalProfile函数需要我们自己去定义(函数的详情建议下一个Windows NT4的源码查看),函数原型如下:
1 | NTSTATUS |
最后你可能还要注意一下堆栈的平衡问题,shellcode中需要平衡一下堆栈
1 | static VOID ShellCode() |
详细的代码参考这里,最后提权成功
0x06:Pool-OverFlow
这是 Windows kernel exploit 系列的第四部分,前一篇我们讲了任意内存覆盖漏洞,这一篇我们讲内核池溢出漏洞,这一篇篇幅虽然可能不会很多,但是需要很多的前置知识,也就是说,我们需要对Windows内存分配机制有一个深入的理解,我的建议是先看《0day安全:软件漏洞分析技术第二版》中的第五章堆溢出利用,里面很详细的讲解了堆的一些机制,但是主要讨论的是 Windows 2000~Windows XP SP1 平台的堆管理策略,看完了之后,类比堆溢出利用你可以看 Tarjei Mandt 写的 Kernel Pool Exploitation on Windows 7 ,因为我们的实验平台是 Windows 7 的内核池,所以我们需要对内核池深入的理解,总之这个过程是漫长的,并不是一两天就能搞定的,话不多说,进入正题,看此文章之前你需要有以下准备:
- Windows 7 x86 sp1虚拟机
- 配置好windbg等调试工具,建议配合VirtualKD使用
- HEVD+OSR Loader配合构造漏洞环境
0x01:漏洞原理
池溢出原理
我们暂时先不看源码,先用IDA分析HEVD.sys,我们找到TriggerPoolOverflow函数,先静态分析一下函数在干什么,可以看到,函数首先用ExAllocatePoolWithTag函数分配了一块非分页内存池,然后将一些信息打印出来,又验证缓冲区是否驻留在用户模式下,然后用memcpy函数将UserBuffer拷贝到KernelBuffer,这和内核栈溢出有点似曾相识的感觉,同样的拷贝,同样的没有控制Size的大小,只是一个是栈溢出一个是池溢出
1 | int __stdcall TriggerPoolOverflow(void *UserBuffer, unsigned int Size) |
漏洞的原理很简单,就是没有控制好传入Size的大小,为了更清楚的了解漏洞原理,我们分析一下源码文件BufferOverflowNonPagedPool.c,定位到关键点的位置,也就是说,安全的操作始终对分配的内存有严格的控制
1 |
|
0x02:漏洞利用
控制码
漏洞的原理我们已经清楚了,但是关键点还是在利用上,内核池这个东西利用起来就不像栈一样那么简单了,我们还是一步一步的构造我们的exploit吧,首先根据上一篇的经验我们知道如何计算控制码从而调用TriggerPoolOverflow函数,首先找到HackSysExtremeVulnerableDriver.h中定义IOCTL的地方,找到我们对应的函数
1 |
然后我们用python计算一下控制码
1 | hex((0x00000022 << 16) | (0x00000000 << 14) | (0x803 << 2) | 0x00000003) |
我们验证一下我们的代码,我们先给buf一个比较小的值
1 |
|
运行一下如我们所愿调用了TriggerPoolOverflow函数,另外我们可以发现 Pool Size 有 0x1F8(504) 的大小(如果你细心的话其实在IDA中也能看到,另外你可以尝试着多传入几个字节的大小破坏下一块池头的内容,看看是否会蓝屏)
1 | 0: kd> g |
我们现在需要了解内核池分配的情况,所以我们需要在拷贝函数执行之前下断点观察,我们把 buf 设为 0x1F8 大小
1 | 1: kd> u 8D6A320B // 反编译查看断点位置是否下对 |
我们可以用!pool address命令查看address周围地址处的池信息
1 | kd> !pool 0x88CAAA90 |
我们查看我们申请到池的末尾,0x41414141之后就是下一个池的池首,我们待会主要的目的就是修改下一个池首的内容,从而运行我们shellcode
1 | kd> dd 88caac88-8 |
Event Object
从上面的池分布信息可以看到周围的池分布是很杂乱无章的,我们希望是能够控制我们内核池的分布,从源码中我们已经知道,我们的漏洞点是产生在非分页池中的,所以我们需要一个函数像malloc一样申请在我们的内核非分页池中,我们这里使用的是CreateEventA,函数原型如下
1 | HANDLE CreateEventA( |
该函数会生成一个Event事件对象,它的大小为 0x40 ,因为在刚才的调试中我们知道我们的池大小为 0x1f8 + 8 = 0x200,所以多次申请就刚好可以填满我们的池,如果把池铺满成我们的Event对象,我们再用CloseHandle函数释放一些对象,我们就可以在Event中间留出一些我们可以操控的空间,我们构造如下代码测试
1 |
|
可以发现,我们已经把内核池铺成了我们希望的样子
1 | ****** HACKSYS_EVD_IOCTL_POOL_OVERFLOW ****** |
接下来我们加上CloseHandle函数就可以制造一些空洞了
1 | VOID pool_spray() |
重新运行结果如下,我们已经制造了许多空洞
1 | ****** HACKSYS_EVD_IOCTL_POOL_OVERFLOW ****** |
池头伪造
首先我们复习一下x86 Kernel Pool的池头结构_POOL_HEADER,_POOL_HEADER是用来管理pool thunk的,里面存放一些释放和分配所需要的信息
1 | 0: kd> dt nt!_POOL_HEADER |
- PreviousSize: 前一个chunk的BlockSize。
- PoolIndex : 所在大pool的pool descriptor的index。这是用来检查释放pool的算法是否释放正确了。
- PoolType: Free=0,Allocated=(PoolType|2)
- PoolTag: 4个可打印字符,标明由哪段代码负责。(4 printable characters identifying the code responsible for the allocation)
我们在调试中查看下一个池的一些结构
1 | ... |
你可能会疑惑_OBJECT_HEADER和_OBJECT_HEADER_QUOTA_INFO是怎么分析出来的,这里你需要了解 Windows 7 的对象结构不然可能听不懂图片下面的那几行字,最好是在NT4源码(private\ntos\inc\ob.h)中搜索查看这些结构,这里我放一张图片吧
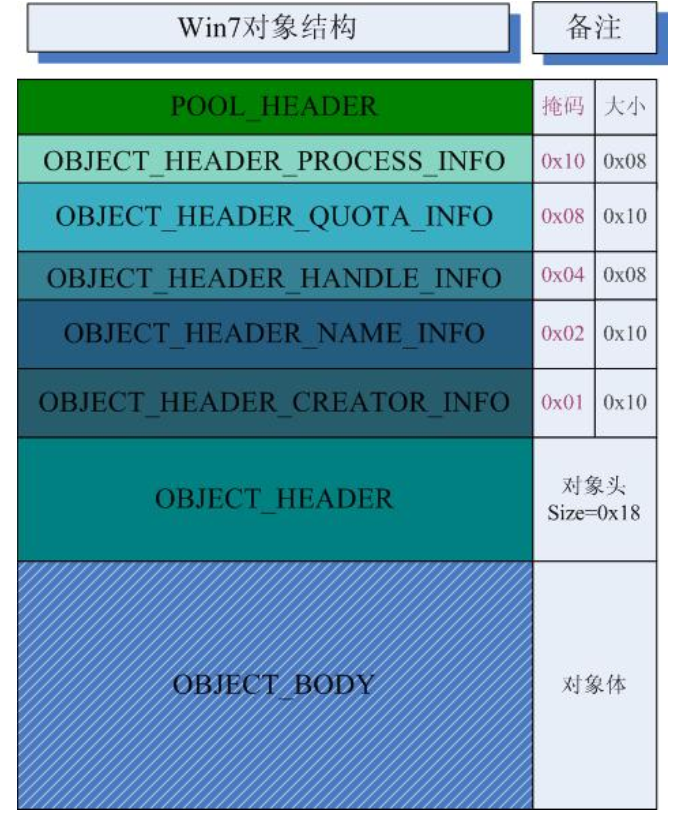
这里我简单说一下如何识别这两个结构的,根据下一块池的大小是 0x40 ,在_OBJECT_HEADER_QUOTA_INFO结构中NonPagedPoolCharge的偏移为0x004刚好为池的大小,所以这里确定为_OBJECT_HEADER_QUOTA_INFO结构,又根据InfoMask字段在_OBJECT_HEADER中的偏移,结合我们确定的_OBJECT_HEADER_QUOTA_INFO结构掩码为0x8可以确定这里就是我们的InfoMask,这样推出_OBJECT_HEADER的位置在+0x18处,其实我们需要修改的也就是_OBJECT_HEADER中的TypeIndex字段,这里是0xc,我们需要将它修改为0,我们看一下_OBJECT_HEADER的结构
1 | 3: kd> dt _OBJECT_HEADER |
Windows 7 之后 _OBJECT_HEADER 及其之前的一些结构发生了变化,Windows 7之前0×008处的指向_OBJECT_TYPE的指针已经没有了, 取而代之的是在 0x00c 处的类型索引值。但Windows7中添加了一个函数ObGetObjectType,返回Object_type对象指针,也就是说根据索引值在ObTypeIndexTable数组中找到对应的ObjectType
1 | 3: kd> u ObGetObjectType |
我们查看一下ObTypeIndexTable数组,根据TypeIndex的大小我们可以确定偏移 0xc 处的 0x865f0598 即是我们 Event 对象的OBJECT_TYPE,我们这里主要关注的是TypeInfo中的CloseProcedure字段
1 | 1: kd> dd nt!ObTypeIndexTable |
我们的最后目的是把CloseProcedure字段覆盖为指向shellcode的指针,因为在最后会调用这些函数,把这里覆盖自然也就可以执行我们的shellcode,我们希望这里能够将Event这个结构放在我们能够操控的位置,在 Windows 7 中我们知道是可以在用户模式下控制0页内存的,所以我们希望这里能够指到0页内存,所以我们想把TypeIndex从0xc修改为0x0,在 Windows 7 下ObTypeIndexTable的前八个字节始终为0,所以可以在这里进行构造,需要注意的是,这里我们需要申请0页内存,我们传入的第二个参数不能是0,如果是0系统就会随机给我们分配一块内存,我们希望的是分配0页,如果传入1的话由于内存对齐就可以申请到0页内存,然后就可以放入我们shellcode的位置了
1 | PVOID Zero_addr = (PVOID)1; |
最后我们整合一下代码就可以提权了,总结一下步骤
- 初始化句柄等结构
- 构造池头结构
- 申请0页内存并放入shellcode位置
- 堆喷射构造间隙
- 调用
TriggerPoolOverflow函数 - 关闭句柄
- 调用cmd提权
最后提权效果如下,详细代码参考这里
0x07:NullPointer-Dereference
这是 Windows kernel exploit 系列的第五部分,前一篇我们讲了池溢出漏洞,这一篇我们讲空指针解引用,这篇和上篇比起来就很简单了,话不多说,进入正题,看此文章之前你需要有以下准备:
- Windows 7 x86 sp1虚拟机
- 配置好windbg等调试工具,建议配合VirtualKD使用
- HEVD+OSR Loader配合构造漏洞环境
0x01:漏洞原理
空指针解引用
我们还是先用IDA分析HEVD.sys,大概看一下函数的流程,函数首先验证了我们传入UserBuffer是否在用户模式下,然后申请了一块池,打印了池的一些属性之后判断UserValue是否等于一个数值,相等则打印一些NullPointerDereference的属性,不相等则将它释放并且置为NULL,但是下面没有做任何检验就直接引用了NullPointerDereference->Callback();这显然是不行,的当一个指针的值为空时,却被调用指向某一块内存地址时,就产生了空指针引用漏洞
1 | int __stdcall TriggerNullPointerDereference(void *UserBuffer) |
我们从源码NullPointerDereference.c查看一下防护措施,安全的操作对NullPointerDereference是否为NULL进行了检验,其实我们可以联想到上一篇的内容,既然是要引用0页内存,那都不用我们自己写触发了,直接构造好0页内存调用这个问题函数就行了
1 |
|
0x02:漏洞利用
控制码
我们还是从控制码入手,在HackSysExtremeVulnerableDriver.h中定位到相应的定义
1 |
然后我们用python计算一下控制码
1 | hex((0x00000022 << 16) | (0x00000000 << 14) | (0x80A << 2) | 0x00000003) |
我们验证一下我们的代码,我们先传入 buf = 0xBAD0B0B0 观察,构造如下代码
1 |
|
如我们所愿,这里因为 UserValue = 0xBAD0B0B0 所以打印了NullPointerDereference的一些信息
1 | ****** HACKSYS_EVD_IOCTL_NULL_POINTER_DEREFERENCE ****** |
零页的构造
我们还是用前面的方法申请到零页内存,只是我们这里需要修改shellcode指针放置的位置
1 | PVOID Zero_addr = (PVOID)1; |
shellcode还是注意需要堆栈的平衡,不然可能就会蓝屏,有趣的是,我在不同的地方测试的效果不一样,也就是说在运行exp之前虚拟机的状态不一样的话,可能效果会不一样(这一点我深有体会)
1 | static VOID ShellCode() |
最后我们整合一下代码就可以提权了,总结一下步骤
- 初始化句柄等结构
- 申请0页内存并放入shellcode位置
- 调用
TriggerNullPointerDereference函数 - 调用cmd提权
提权效果如下,详细的代码参考这里

0x08:Uninitialized-StackVariable
这是 Windows kernel exploit 系列的第六部分,前一篇我们讲了空指针解引用,这一篇我们讲内核未初始化栈利用,这篇虽然是内核栈的利用,与前面不同的是,这里需要引入一个新利用手法 => 栈喷射,需要你对内核栈和用户栈理解的比较深入,看此文章之前你需要有以下准备:
- Windows 7 x86 sp1虚拟机
- 配置好windbg等调试工具,建议配合VirtualKD使用
- HEVD+OSR Loader配合构造漏洞环境
0x01:漏洞原理
未初始化栈变量
我们还是先用IDA分析HEVD.sys,找到相应的函数TriggerUninitializedStackVariable
1 | int __stdcall TriggerUninitializedStackVariable(void *UserBuffer) |
我们仔细分析一下,首先函数将一个值设为0,ms_exc原型如下,它其实就是一个异常处理机制(预示着下面肯定要出异常),然后我们还是将传入的UserBuffer和 0xBAD0B0B0 比较,如果相等的话就给UninitializedStackVariable函数的一些参数赋值,后面又判断了回调函数的存在性,最后调用回调函数,也就是说,我们传入的值不同的话可能就存在利用点,所以我们将聚焦点移到UninitializedStackVariable函数上
1 | typedef struct CPPEH_RECORD |
我们来看一下源码里是如何介绍的,显而易见,一个初始化将UninitializedMemory置为了NULL,而另一个没有,要清楚的是我们现在看的是内核的漏洞,与用户模式并不相同,所以审计代码的时候要非常仔细
1 |
|
0x02:漏洞利用
控制码
我们还是从控制码入手,在HackSysExtremeVulnerableDriver.h中定位到相应的定义
1 |
然后我们用python计算一下控制码
1 | hex((0x00000022 << 16) | (0x00000000 << 14) | (0x80b << 2) | 0x00000003) |
我们验证一下我们的代码,我们先传入 buf = 0xBAD0B0B0 观察,构造如下代码
1 |
|
这里我们打印的信息如下,可以看到对UninitializedStackVariable的一些对象进行了正确的赋值
1 | ****** HACKSYS_EVD_IOCTL_UNINITIALIZED_STACK_VARIABLE ****** |
我们尝试传入不同的值
1 | VOID Trigger_shellcode() |
运行效果如下,因为有异常处理机制,所以这里并不会蓝屏
1 | 0: kd> g |
我们在HEVD!TriggerUninitializedStackVariable+0x8c比较处下断点运行查看
1 | 1: kd> u 8D6A3F86 |
我们断下来之后用dps esp可以看到我们的 Value 和 Callback ,单步几次观察,可以发现确实已经被SEH异常处理所接手
1 | ****** HACKSYS_EVD_IOCTL_UNINITIALIZED_STACK_VARIABLE ****** |
栈喷射(Stack Spray)
因为程序中会调用回调函数,所以我们希望的是把回调函数设置为我们shellcode的位置,其实如果这里不对回调函数进行验证是否为0,我们可以考虑直接在0页构造我们的shellcode,但是这里对回调函数进行了限制,就需要换一种思路
1 | #endif |
我们需要把回调函数的位置修改成不为0的地址,并且地址指向的是我们的shellcode,这里就需要用到一个新的方法,栈喷射,j00ru师傅的文章很详细的讲解了这个机制,我简单解释一下,我们始终是在用户模式干扰内核模式,首先你需要了解内核栈和用户栈的结构,然后了解下面这个函数是如何进行栈喷射的,函数原型如下
1 |
|
因为COPY_STACK_SIZE的大小是1024,函数的栈最大也就 4096byte ,所以我们只需要传 1024 * 4 = 4096 的大小就可以占满一页内存了,当然我们传的都是我们的shellcode的位置
1 | PDWORD StackSpray = (PDWORD)malloc(1024 * 4); |
我们来看看我们完整的exp的运行情况,我们还是在刚才的地方下断点,可以清楚的看到我们的shellcode已经被喷上去了
1 | 0: kd> ba e1 8D6A3F86 |
最后我们整合一下代码就可以提权了,总结一下步骤
- 初始化句柄等结构
- 将我们准备喷射的栈用Shellcode填满
- 调用
NtMapUserPhysicalPages进行喷射 - 调用
TriggerUninitializedStackVariable函数触发漏洞 - 调用cmd提权
提权效果如下,详细的代码参考这里
0x09:Uninitialized-HeapVariable
这是 Windows kernel exploit 系列的最后一篇,如果你按顺序观看我之前文章并且自己调过的话,应该对各种漏洞类型在Windows 7 下的利用比较熟悉了,其他的话我放在最后说把,现在进入我所谓的最后一个专题,未初始化的堆变量利用,看此文章之前你需要有以下准备:
- Windows 7 x86 sp1虚拟机
- 配置好windbg等调试工具,建议配合VirtualKD使用
- HEVD+OSR Loader配合构造漏洞环境
0x01:漏洞原理
未初始化堆变量
我们还是先用IDA分析HEVD.sys,找到相应的函数TriggerUninitializedHeapVariable,这里首先还是初始化了异常处理机制,验证我们传入的UserBuffer是否在 user mode ,然后申请了一块分页池,将我们的UserBuffer给了UserValue,判断是否等于 0xBAD0B0B0 ,如果相等则给回调函数之类的赋值,如果不相等则直接调用回调函数,根据前一篇的经验,这里肯定是修改回调函数为我们shellcode的位置,最后调用提权
1 | int __stdcall TriggerUninitializedHeapVariable(void *UserBuffer) |
我们查看一下源码文件是如何说明的,安全的方案先检查了是否存在空指针,然后将UninitializedMemory置为NULL,最后安全的调用了回调函数,而不安全的方案则在不确定 Value 和 Callback 的情况下直接调用了回调函数
1 |
|
漏洞的原理我们很清楚了,现在就是如何构造和利用的问题了,如果你没有看过我之前的文章,建议看完这里之后去看看池溢出那一篇,最好是读一下文章中所提到的Tarjei Mandt 写的 Kernel Pool Exploitation on Windows 7,对Windows 7 内核池有一个比较好的认识
0x02:漏洞利用
控制码
我们还是从控制码入手,在HackSysExtremeVulnerableDriver.h中定位到相应的定义
1 |
然后我们用python计算一下控制码
1 | hex((0x00000022 << 16) | (0x00000000 << 14) | (0x80c << 2) | 0x00000003) |
我们验证一下我们的代码,我们先传入 buf = 0xBAD0B0B0 观察,构造如下代码
1 |
|
这里我们打印的信息如下,如我们所愿,并没有异常发生
1 | 3: kd> g |
我们尝试传入不同的值观察是否有异常发生
1 | VOID Trigger_shellcode() |
我们在调用运行效果如下,这里被异常处理所接受,这里我们Callback有一个值,我们查看之后发现是一个无效地址,我们希望的当然是指向我们的shellcode,所以就需要想办法构造了
1 | ****** HACKSYS_EVD_IOCTL_UNINITIALIZED_HEAP_VARIABLE ****** |
构造堆结构
现在我们已经有了思路,还是把Callback指向shellcode,既然上一篇类似的问题能够栈喷射,那这里我们自然想到了堆喷射,回想我们在池溢出里堆喷射所用的函数CreateEventA,这里我们多研究一下这个函数,要知道我们这里是分页池而不是非分页池,如果你用池溢出那一段申请很多Event对象的代码的话,是看不到一个Event对象存在分页池里面的(并且会蓝屏),但是函数中的lpName这个参数就比较神奇了,它是分配在分页池里面的,并且是我们可以操控的
1 | HANDLE CreateEventA( |
为了更好的理解这里的利用,让我们复习一下 Windows 7 下的Lookaside Lists快表结构,并且我们知道最大块大小是0x20,最多有256个块(前置知识来自Tarjei Mandt的Kernel Pool Exploitation on Windows 7文章),这里要清楚的是我们是在修改快表的结构,因为申请池一开始是调用的快表,如果快表不合适才会去调用空表(ListHeads)
1 | typedef struct _GENERAL_LOOKASIDE_POOL |
我们还需要知道的是,我们申请的每一个结构中的lpName还不能一样,不然两个池在后面就相当于一个在运作,又因为pool size为0xf0,加上header就是0xf8,所以我们这里考虑将lpName大小设为0xf0,因为源码中我们的堆结构如下:
1 | typedef struct _UNINITIALIZED_HEAP_VARIABLE { |
我们可以确定回调函数在 +0x4 的位置,放入我们的shellcode之后我们在利用循环中的 i 设置不同的 lpname 就行啦
1 | for (int i = 0; i < 256; i++) |
最后我们整合一下代码就可以提权了,总结一下步骤
- 初始化句柄等结构
- 构造 lpName 结构
- 调用
CreateEventW进行喷射 - 调用
TriggerUninitializedHeapVariable函数触发漏洞 - 调用cmd提权
提权的过程中你可以参考下面几个地方查看相应的位置是否正确
1 | 0: kd> g |
提权效果如下,详细的代码参考这里

0x10:后记
本系列文章首发于先知社区,为了方便自己查阅,这篇是我重新整理之后的文章
参考链接