编写硬盘驱动程序
创建新磁盘文件
下面我们需要逐步实现文件系统,在此之前我们需要实现一个硬盘驱动程序,我们之前一直操作的hd60M.img为主盘,里面存放的是我们的内核,我们需要创建一个从盘,用于存放后面的文件系统,具体操作如下,创建一个大小为80MB的hd80M.img磁盘
1 | /home/guang/soft/bochs-2.6.2/bin > ls // 进入bin目录 |
运行bochs观察0x475处物理地址是否显示硬盘数1,表示之前创建的内核镜像hd60M.img
1 | <bochs:2> c |
然后我们需要修改bochsrc.disk文件,将参数写入配置文件
1 | # Configuration file for Bochs |
再次运行bochs测试,成功写入
1 | <bochs:1> c |
创建磁盘分区表
首先我们需要配置hd80M.img,将其分区,因Ubuntu 16.04需要给 EFI 代码留磁盘最开始的1M空间,所以分区是从2048开始的,具体的分区结果如下所示,其中5-9分区属性类型设为未知
1 | 设备 启动 Start 末尾 扇区 Size Id 类型 |
编写硬盘驱动
现在硬盘上有两个ata通道,第一个通道其中断信号都是挂在8259A的IRQ14上的,第二个通道接在8259A从片的IRQ15上。来自8259A从片的中断都是由8259A主片想处理器传达的,8259A从片是级联在主片的IRQ2接口的,为了让处理器响应8259A从片的中断,需要我们修改interrupt文件,打开中断
1 | /* 初始化可编程中断控制器8259A */ |
我们在内核实现一个内核打印函数,这样就不需要用console系列打印了,具体实现和printf很相似就不详细说明了
1 | /* 供内核使用的格式化输出函数 */ |
接下来具体实现硬盘驱动,首先我们需要引入结构体,具体实现在device目录下创建ide文件
1 | /* 分区结构 */ |
具体实现中我们用到了三个操作命令,分别是identify指令、读扇区指令、写扇区指令
1 | /* 一些硬盘操作的指令 */ |
初始化函数如下,通过获取0x475物理地址处的内容得到硬盘数量,然后通过DIV_ROUND_UP向上取正的宏计算通道数,然后再循环处理每一个通道
1 | uint8_t channel_cnt; // 按硬盘数计算的通道数 |
完善基础构件
在下一步之前我们需要完善一些基础构建,首先我们需要实现thread_yield,其作用是主动把CPU使用权让出来,代码添加在thread文件中
1 | /* 主动让出cpu,换其它线程运行 */ |
下一步实现idle线程,此线程作用就是当就绪队列中没有任务时运行,以免系统悬停在其他地方
1 | /* 系统空闲时运行的线程 */ |
接下来我们需要实现休眠函数,也就是经常使用的sleep函数,为的是当磁盘操作的时候使CPU去执行其他任务,避免资源浪费,改动在timer文件中
1 |
|
接下来继续实现硬盘中断处理函数,下面是选择主盘和从盘的函数,原理就是判断DEV位
1 | /* 选择读写的硬盘 */ |
写入硬盘控制器函数
1 | /* 向硬盘控制器写入起始扇区地址及要读写的扇区数 */ |
命令发送函数
1 | /* 向通道channel发命令cmd */ |
读写硬盘中数据的函数和等待函数
1 | /* 硬盘读入sec_cnt个扇区的数据到buf */ |
读写硬盘函数和中断处理函数,注意和上面函数的区别,下面的函数是从硬盘hd的扇区地址lba处读取sec_cnt个扇区到buf,上面的函数是从硬盘hd中读入sec_cnt个扇区的数据到buf
1 | /* 从硬盘读取sec_cnt个扇区到buf */ |
获取硬盘信息和扫描分区表
获取硬盘信息需要用到identify命令,其返回内容如下

扫描分区表需要从MBR开始一步一步遍历主分区,找到扩展分区,然后递归每一个子扩展分区,找到逻辑分区,还是在ide文件中,下面是添加的数据结构
1 | /* 用于记录总扩展分区的起始lba,初始为0,partition_scan时以此为标记 */ |
下面是获取硬盘参数的具体实现
1 | /* 将dst中len个相邻字节交换位置后存入buf */ |
下面是扫描分区表的具体实现
1 | /* 扫描硬盘hd中地址为ext_lba的扇区中的所有分区 */ |
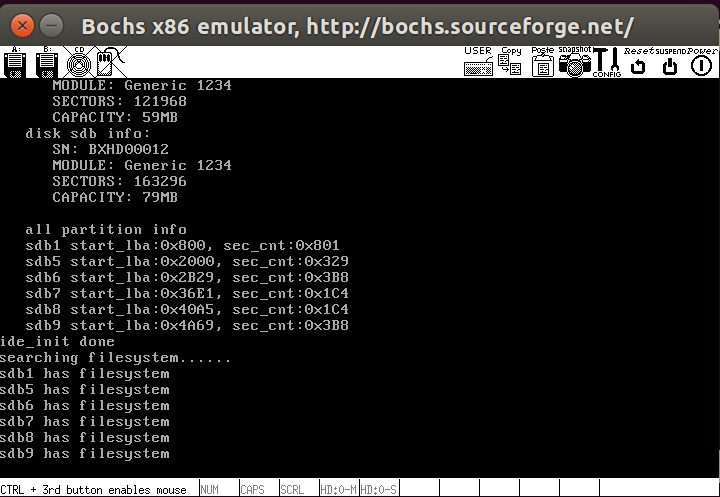
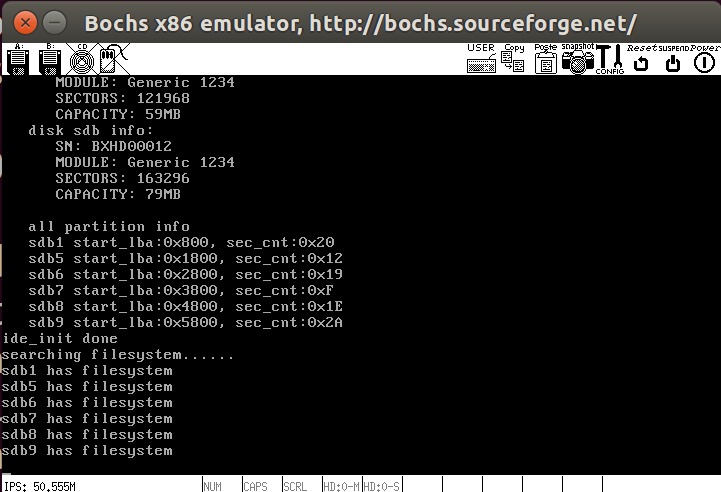
测试结果如下所示
文件系统
基本概念
扇区:硬盘是低速设备,其读写单位是扇区。
块:Windows系统中称为簇,一个块由多个扇区组成,磁盘在进行读写数据的时候,不可能有一扇区的数据就读或写一次,而是等数据累计到一定量后,在统一进行读写,而这个数据量就叫块。
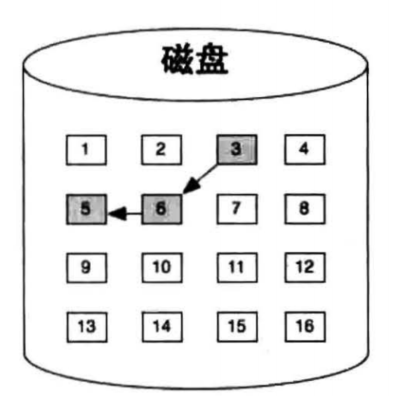
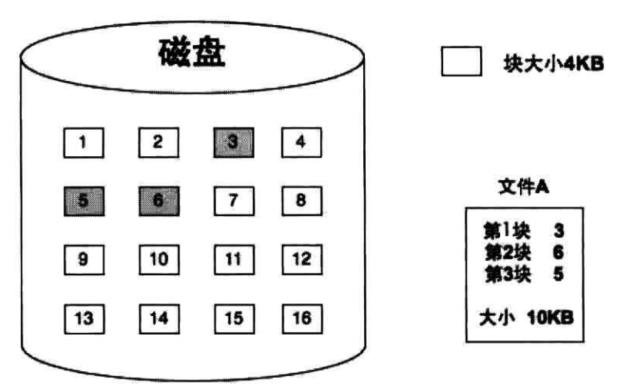
块是文件系统的读写单位,故文件起码得有一个块大小,若大于一个块,就需要我们用不同的文件系统对其进行管理,其中FAT采用的就是链式文件系统,如下所示,其弊端是每次寻找块的时候需要从头开始遍历,效率很低,这也是早期Windows采用的管理方法
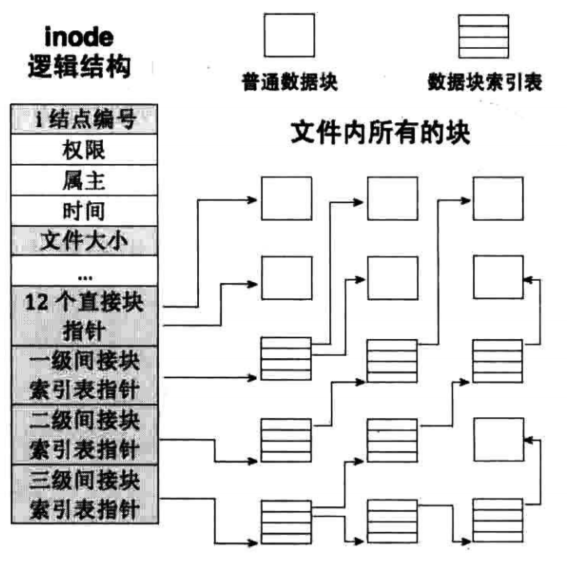
索引式文件系统是进入UNIX时代的产物,它为文件的所有块建立一个索引表,索引表就是块地址数组,每个数组元素就是块的地址,第n个数组元素指向文件中的第n个块,这样访问任意一个块的时候,只需要从索引表中获得块地址就可以了。而且文件中的块依然可以分散到不连续的零散空间中,索引表的索引结构称为inode,一个文件对应一个inode
和页表机制类似,索引表本身占用内存,当其很大的时候就有一级间接索引表、二级间接索引表、三级间接索引表,结构如下
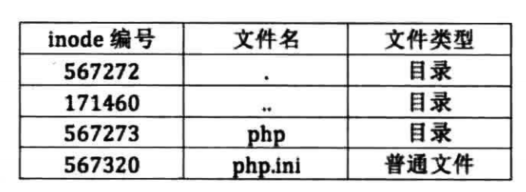
接下来说说目录和目录项,目录本身也是通过inode表示,区分目录和文件的方法是通过查看inode中数据块,普通文件的inode的数据块是指向普通文件自己的数据的,目录的inode的数据块是指向位于该目录下的目录项的。在目录项中会记录该文件的类型,是属于普通文件,还是属于一个目录。目录项结构图如下,索引文件数据的步骤:
- 首先通过文件名找到位于该目录项中对应的inode编号
- 然后通过通过这个inode编号在inode数组中找到该文件对应的inode
- 最后通过这个文件对应的inode找到该文件对应的数据。
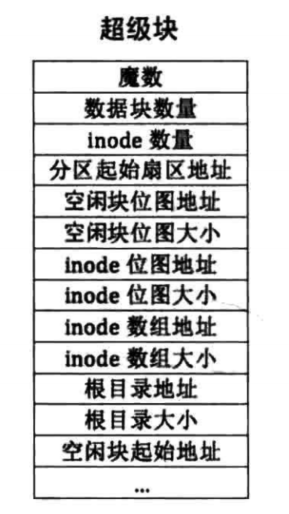
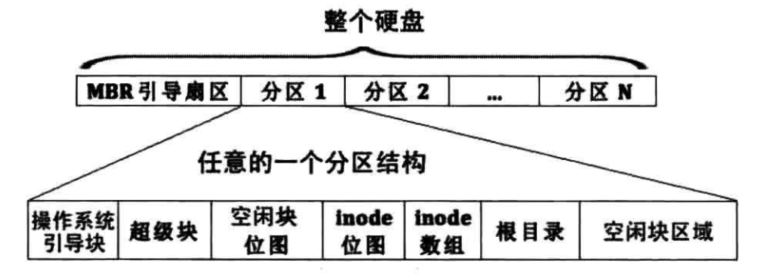
用于管理inode结构和记录的数据结构叫做超级块,超级块的位置和大小是固定的,它被固定存储在各个分区的第2个扇区中,通常占用1扇区的大小,可以类比PCB结构,结构图如下所示
创建文件系统
接下来开始一步一步实现,文件系统部分的函数很多,不建议纠结一个函数的作用,要从整体上思考其作用何在,接下来我们开始创建上述的一些数据结构,下面是超级块结构
1 | /* 超级块 */ |
inode结构
1 | struct inode |
目录和目录项的结构
1 | enum file_types |
创建文件系统有以下几步:
- 根据分区大小,计算分区文件系统各元信息需要的扇区数及位置
- 在内存中创建超级块,将上面的元信息写入超级块
- 将超级块写入磁盘
- 将元信息写入磁盘上各自的位置
- 将根目录写入磁盘
1 | /* 格式化分区,也就是初始化分区的元信息,创建文件系统 */ |
创建之后的示意图如下
接下来就是调用上面代码的初始化函数
1 | /* 在磁盘上搜索文件系统,若没有则格式化分区创建文件系统 */ |
我们需要运行两次,第一次负责创建,第二次运行显示创建完毕
挂载分区
为了操作任意一个分区,实现对分区的”拿”和”收”,我们需要完成挂载分区,其实质是把该分区的文件系统的元信息从硬盘上读出来加载到内存中,这样硬盘资源的变化都用内存中元信息来跟踪
1 | struct partition* cur_part; // 默认情况下操作的是哪个分区 |
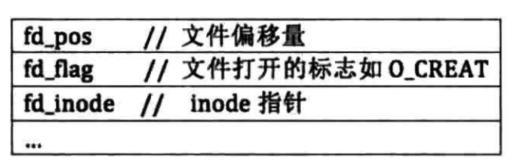
文件描述符
文件描述符是用户能够交互的对象,它与inode不同的是inode是操作系统为自己的文件系统准备的数据结构,仅供其内部使用,用户难以接触到。用户进程可以多次打开同一个文件,一个文件也可也被多个进程同时打开,每次打开文件的时候,我们就需要记录当时文件的状态,比如当时读取的位置,也叫文件偏移量、文件打开的标志信息,inode指针等,基本结构如下图所示
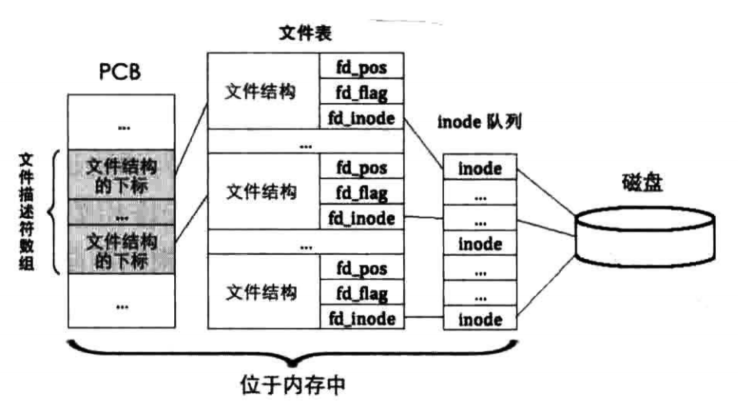
熟悉Linux编程的朋友肯定知道open函数,其成功调用返回值就是文件描述符,通常情况下是一个int类型的数值0~2,它实际上作为进程pcb中文件描述符数组的下标索引,其指向一个文件结构,在结构中才能获取到文件信息,pcb不直接指向描述符的原因是每次打开文件的时候就需要记录一次,如果这样的话pcb就会变得很大而损失效率,所以采取索引的方式记录,关系图如下所示
下面是具体定义,增加描述符数组在thread文件的task_struct结构中
1 |
|
文件描述符的初始化如下
1 | /* 初始化线程基本信息 */ |
inode相关函数
要想操作文件使其创建、打开、读写,首先得准备一些对inode相关操作的函数,存储inode信息的结构如下
1 | /* 用来存储inode位置 */ |
下面是获取inode所在扇区和扇区内的偏移函数
1 | /* 获取inode所在的扇区和扇区内的偏移量 */ |
将inode写入到分区part
1 | /* 将inode写入到分区part */ |
打开和关闭节点的操作函数,其中part->open_inodes的存在是为了提高效率,减少直接访问磁盘的频率
1 | /* 根据i结点号返回相应的i结点 */ |
初始化inode函数
1 | /* 初始化new_inode */ |
文件相关函数
文件的一些基本结构定义如下,在fs目录下的file文件中实现
1 | /* 文件结构 */ |
下面是一些文件操作函数
1 | /* 文件表 */ |
目录相关函数
下面是一些目录操作的基本函数,下面几个函数功能主要是打开和索引
1 | struct dir root_dir; // 根目录 |
接下来的两个函数负责关闭目录和初始化目录项,需要注意的是根目录不能关闭
1 | /* 关闭目录 */ |
最后这个函数负责将目录项p_de写入父目录parent_dir中,io_buf由主调函数提供
1 | /* 将目录项p_de写入父目录parent_dir中,io_buf由主调函数提供 */ |
路径解析相关函数
路及解析就是把路径按照路径分隔符拆分成多层文件名,逐层在磁盘上查找以确认文件名是否存在,如/a/b/c拆分为a,b,c。下面的代码比较好理解,就不多解释了
1 | /* 将最上层路径名称解析出来 */ |
实现文件检索功能
文件检索主要负责判断文件是否存在,判断文件同名的这种情况,下面是fs中更新的一些结构体,path_search_record负责查找文件过程中已经处理过的上级路径,比如查找/a/b/c若找不到的话就需要知道是c不存在还是上级目录a和b不存在,若c不存在searched_path值就为/a/b/c,若b不存在searched_path的值就为/a/b
1 |
|
下面是具体实现
1 | /* 搜索文件pathname,若找到则返回其inode号,否则返回-1 */ |
创建文件
首先我们需要实现file_create函数,在实现之前先梳理创建文件的过程:
- inode负责描述文件的属性,所以首先为文件创建inode,该过程需要向inode的管理单元inode_bitmap申请inode号,并更新inode_bitmap
- 确定文件存储的扇区地址,这个需要在block_bitmap中申请可用的块,并更新block_bitmap
- 新增的文件必然位于某个目录中,所以该目录的目录项数量要加1,并且要将新增的目录项写入目录对应的扇区中,如果原有的扇区已满,需要申请新扇区来存储目录项
- 若其中某步失败则回滚之前成功的操作
- 将上面过程中被改变的数据写入硬盘中
1 | /* 创建文件,若成功则返回文件描述符,否则返回-1 */ |
实现sys_open
open函数的功能相当强大,通过它的打开标志,修改其调用参数,不仅可以打开一个文件,同样可以创建一个文件,所以不单独实现create类函数,文件的创建过程中主要是对绝对路径的解析。在路径没有问题且该文件不存在的前提下,标志设置为O_CREAT,就会调用之前的file_create函数创建文件。
1 | /* 打开或创建文件成功后,返回文件描述符,否则返回-1 */ |
下面修改main函数并验证
1 | int main(void) { |
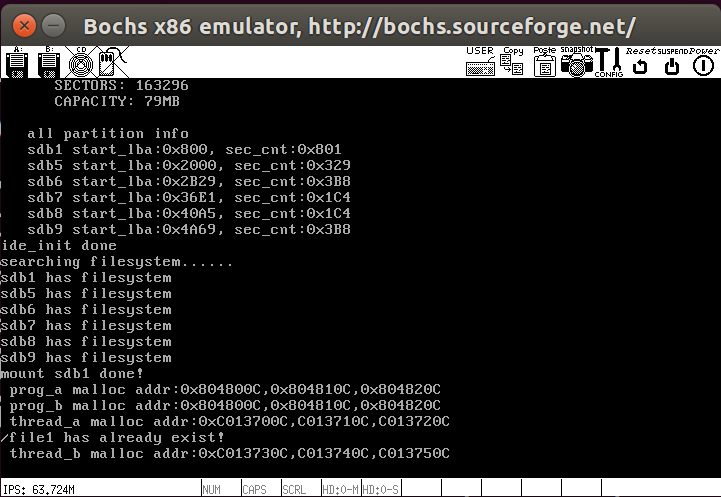
测试结果如下,第二次运行显示文件已经存在
接下来我们需要继续改进sys_open,使其支持更多功能,打开文件的核心操作是file_open,实现如下
1 | /* 打开编号为inode_no的inode对应的文件,若成功则返回文件描述符,否则返回-1 */ |
sys_open中增加一个case判断
1 | switch (flags & O_CREAT) { |
实现sys_close
close函数原型是int close(int fd),其底层核心是file_close
1 | /* 关闭文件 */ |
sys_close实现如下
1 | /* 将文件描述符转化为文件表的下标 */ |
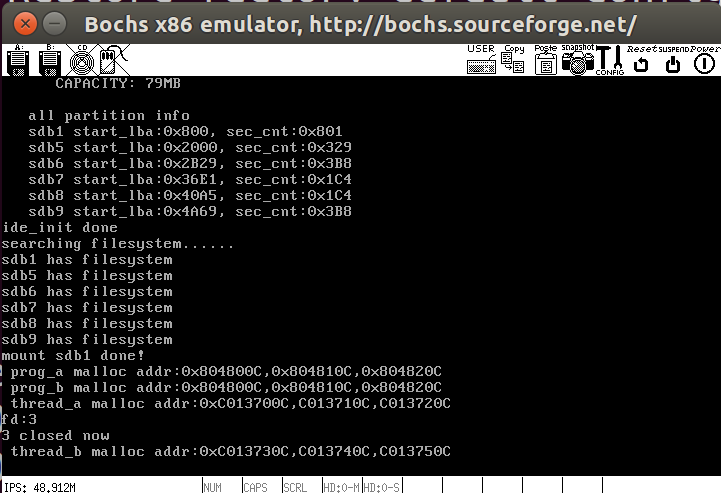
main函数中测试一下刚才的代码
1 | int main(void) { |
我们成功将file1关闭
实现文件写入
首先我们需要实现file_write函数,其作用是系统调用write的内核实现,文件最大尺寸是140个块,也就是支持140*512字节数据。写入文件时要判断是否需要分配新的数据块。如果12个直接块不够存储该数据,就分配间接块来存储,当所需的数据块分配好了之后,就会逐块的往硬盘上写入数据,直到所有的数据被写入硬盘,最后返回写入的字节数,代码略长
1 | /* 把buf中的count个字节写入file,成功则返回写入的字节数,失败则返回-1 */ |
接下来改进sys_write
1 | /* 将buf中连续count个字节写入文件描述符fd,成功则返回写入的字节数,失败返回-1 */ |
write系统调用
1 | /* 把buf中count个字符写入文件描述符fd */ |
下面修改一些其他文件就可以对新版write进行测试,main中测试代码如下
1 | int main(void) { |
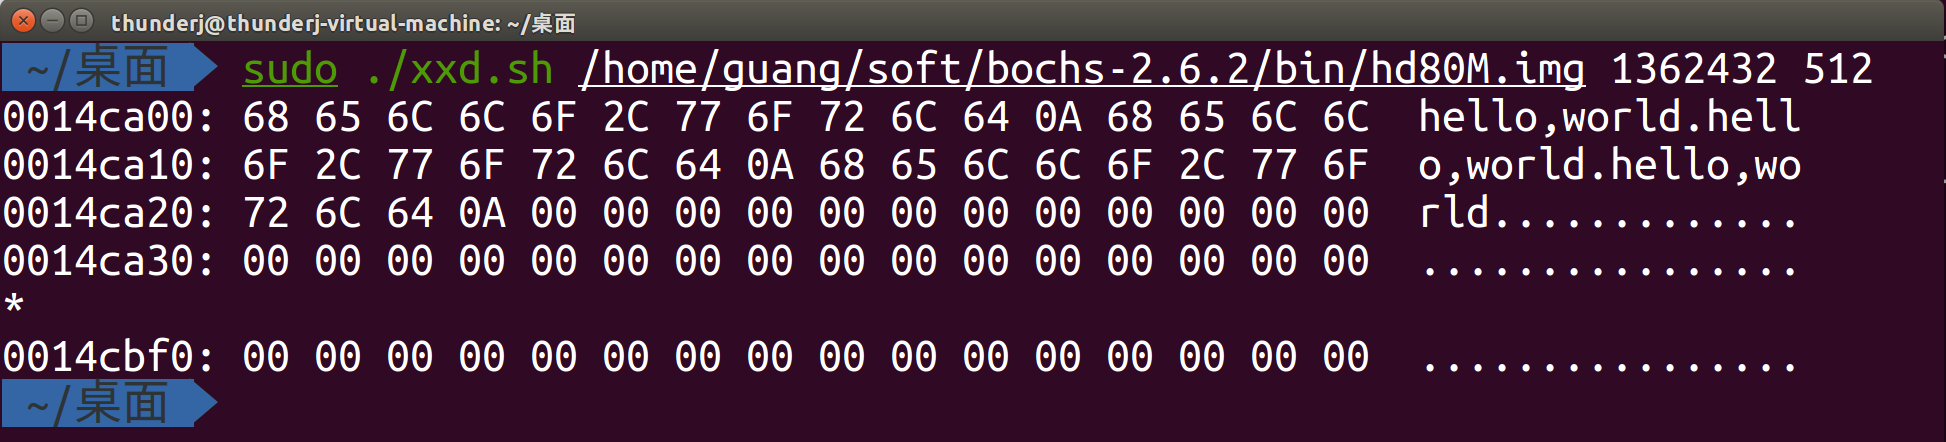
测试结果如下,这里写入了0xA65处的内存
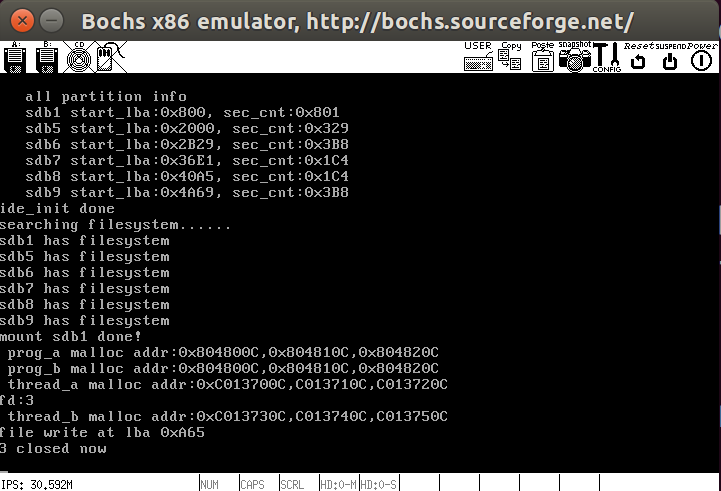
下面用脚本文件查看0xA65处的内存,这里我连续运行了三次,数据写入和更新正确
读取文件
上面实现了写入的功能,下面添加读取文件file_read函数,还是老规矩,file文件中先添加框架,然后在fs文件中添加系统调用,实现和write类似,要判断是否超过12个块
1 | /* 从文件file中读取count个字节写入buf, 返回读出的字节数,若到文件尾则返回-1 */ |
接下来就是sys_read,其实就是对file_read的封装
1 | /* 从文件描述符fd指向的文件中读取count个字节到buf,若成功则返回读出的字节数,到文件尾则返回-1 */ |
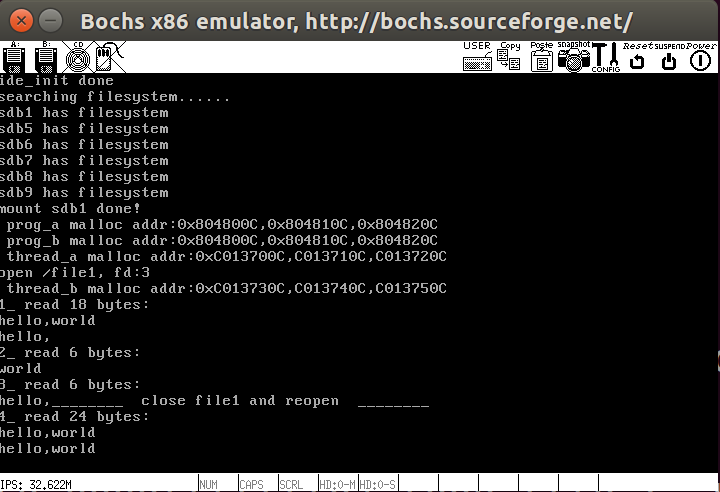
下面直接测试,main中测试代码如下
1 | int main(void) { |
测试结果如下,和之前写入了三次helloworld数据相符
实现文件读写指针定位
这个功能类似lseek函数,本质上就是设置文件读写时的起始偏移量,我们需要自由设置文件指针,文件的读写偏移量的设置有三个标志,文件头,文件当前位置,文件尾。
1 | // 文件读写位置偏移量 |
下面是具体实现,其中分别处理了三种flag的情况
1 | /* 重置用于文件读写操作的偏移指针,成功时返回新的偏移量,出错时返回-1 */ |
实现文件删除
lseek函数就不单独测试了,下面实现文件删除函数,过程起始就是创建文件的逆过程,我们需要回收inode和删除目录项。
inode相关资源如下
- inode位图
- inode_table
- inode中i_sectors[0~11]中的直接块和一级间接索引块表i_sector[12]中的间接块
- 一级间接索引块表本身的扇区地址
目录项相关资源如下
- 该文件对应的目录项数据需要清0
- 根目录必须存在且不能被清空,该文件删除之后,目录中不存在目录项,需要回收目录项对应的块
- 目录inode中的size需要减去该文件目录项大小
- 将目录inode同步到硬盘
下面是删除inode部分,其中inode_delete是可有可无的,调试相关
1 | /* 将硬盘分区part上的inode清空 */ |
删除目录项部分
1 | /* 把分区part目录pdir中编号为inode_no的目录项删除 */ |
接下来就是sys_unlink的实现,Linux中删除文件是通过unlink系统调用,原型为int unlink(const char *pathname),成功删除返回0,否则返回-1
1 | /* 删除文件(非目录),成功返回0,失败返回-1 */ |
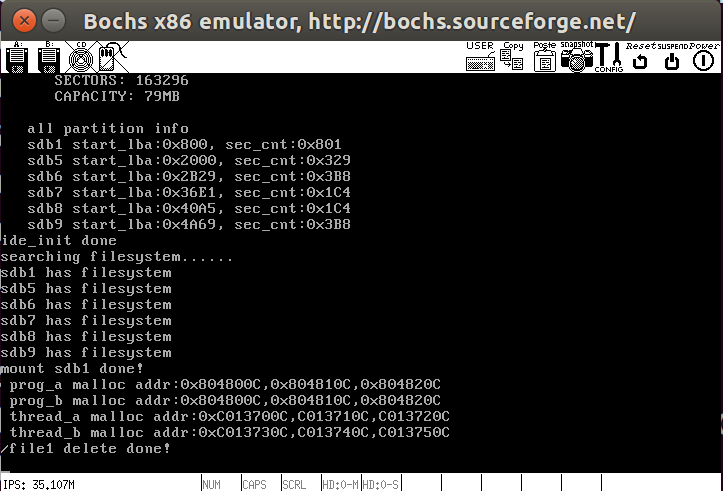
接下来在main中测试
1 | int main(void) { |
测试结果如下
创建目录
下面实现sys_mkdir函数创建目录,其原型是int mkdir(const char *pathname,mode_t mode),所涉及的步骤如下
- 确认待创建的新目录在文件系统上不存在
- 为新目录创建inode
- 为新目录分配1个块储存该目录中的目录项
- 在新目录中创建两个目录项”.”和”..”,这是每个目录都必须存在的两个目录项
- 在新目录的父目录中添加新目录的目录项
- 将资源同步到硬盘
1 | /* 创建目录pathname,成功返回0,失败返回-1 */ |
接下来进行测试,因为前面删除了file1文件,这里重新创建一个进行测试
1 | int main(void) { |
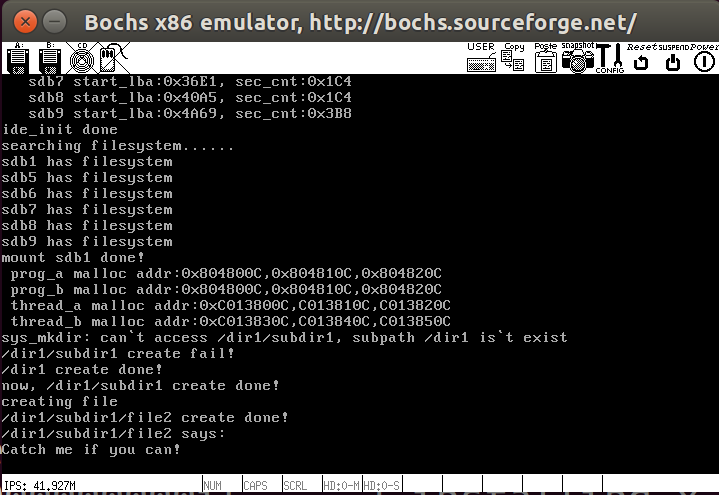
测试结果如下
遍历目录
遍历目录的原型是opendir和closedir,本质是读取目录中所有的目录项,先打开目录然后遍历,最后关闭目录。下面是sys_opendir和sys_closedir的实现部分,根目录只是简单处理”/.”和”/..”的情况
1 | /* 目录打开成功后返回目录指针,失败返回NULL */ |
下面简单测试一下
1 | int main(void) { |
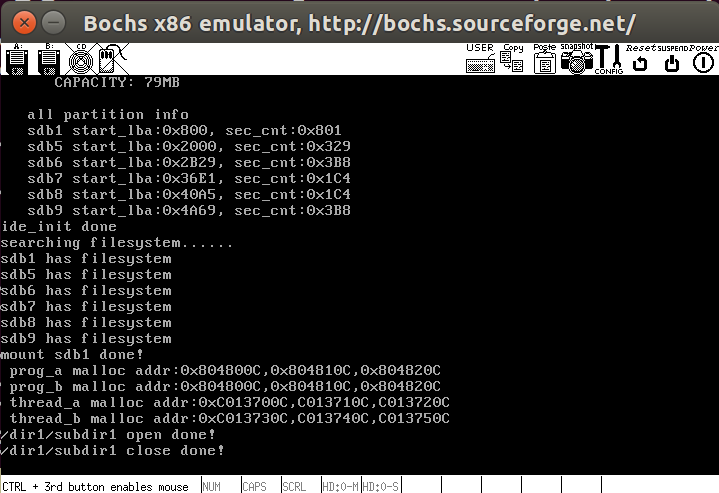
运行结果如下
我们的目的是遍历目录,我们已经实现了第一步打开和关闭,接下来实现读取目录函数readdir,读取目录的本质是读取目录中的目录项,readdir每次返回目录的一个目录项地址,遍历目录需要循环调用readdir函数,下面是具体实现
1 | /* 读取目录,成功返回1个目录项,失败返回NULL */ |
实现sys_readdir及sys_rewinddir
readdir原型是struct dirent *readdir(DIR *dirp),我们也是根据此接口进行实现。在遍历目录的时候我们需要用到目录回绕的功能,使目录的游标dir_pos回到0,他与lseek类似,这里我们用rewinddir实现,其原型是void rewinddir(DIR *dirp),下面是系统调用的实现
1 | /* 读取目录dir的1个目录项,成功后返回其目录项地址,到目录尾时或出错时返回NULL */ |
下面测试一下,首先打开目录’/dir1/subdir1’,然后输出目录内容
1 | int main(void) { |
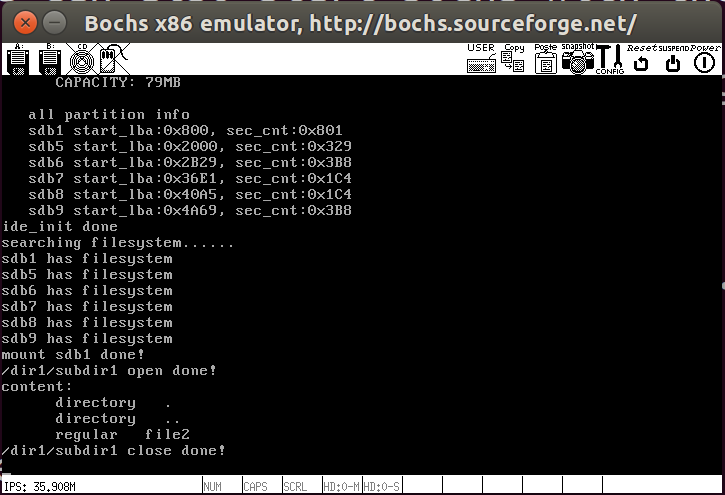
结果如下所示
删除目录
在删除目录的时候目录非空的话应有提示,故我们需要在删除目录时先判断目录是否为空,不允许删除非空目录,我们继续改进dir文件
1 | /* 判断目录是否为空 */ |
下面实现sys_rmdir,其原型是int rmdir(const char *pathname),首先判断待删除文件是否存在,然后在进行删除
1 | /* 删除空目录,成功时返回0,失败时返回-1*/ |
下面继续测试,测试代码如下
1 | int main(void) { |
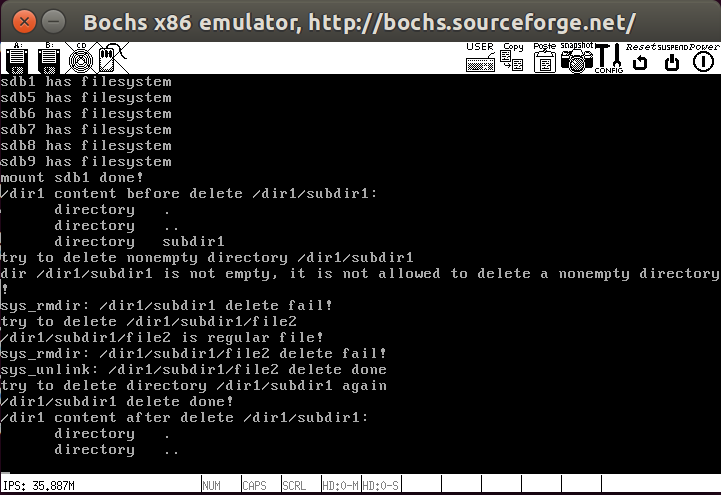
测试结果如下,目前根目录存在file1文件和目录dir1,dir1存在subdir1,subbdir1中存在file2,先直接删除/dir1/subdir1目录,因为目录非空会失败,接下来通过sys_rmdir和sys_unlink分别删除/dir1/subdir1/file2,最后删除/dir1/subdir1,然后再次输出/dir1内容
任务工作目录
接下来我们需要实现Linux中的pwd功能,显示当前工作目录和cd切换目录的功能。其中重点是”..”获取父目录,我们循环使用获取父目录的函数,直到获取到根目录为止就可以获取到绝对路径,下面逐步实现
1 | /* 获得父目录的inode编号 */ |
下面是sys_getcwd的实现,其原型是char *getcwd(char *buf, size_t size),buf若用户不提供就传入NULL,系统用malloc自动分配缓冲区,具体实现如下
1 | /* 把当前工作目录绝对路径写入buf, size是buf的大小. |
Linux中采用chdir改变当前工作目录,原型是int chdir(const char *path),我们先实现接口sys_chdir
1 | /* 更改当前工作目录为绝对路径path,成功则返回0,失败返回-1 */ |
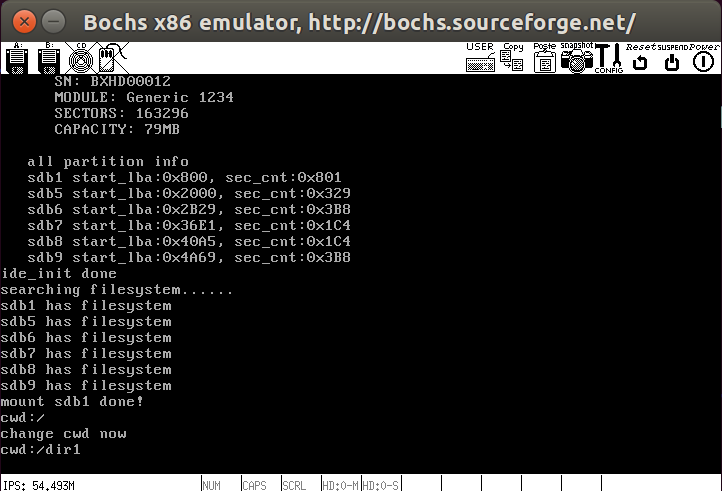
任务工作目录记录在PCB中的cwd_incode_nr中,修改工作目录的核心即修改cwd_incode_nr,接下来在main中进行测试,首先获取当前工作目录并输出,然后将目录改为/dir1,最后再次获得目录并输出
1 | int main(void) { |
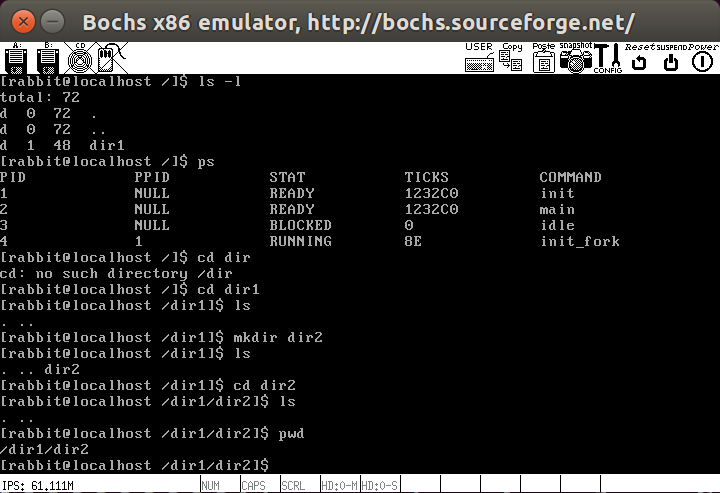
测试结果如下
获得文件属性
在Linux中输入ls -l命令查看目录的时候不仅显示目录中文件,还显示了属性信息,其底层实现是反复使用系统调用write和stat64,其中stat64负责获得文件的属性信息,是64位版本的stat函数,write负责打印信息到屏幕,首先我们需要实现sys_stat,结构体添加如下
1 | /* 文件属性结构体 */ |
下面是具体实现,首先path判断是否为根目录,如果是就直接在buf中写入根目录信息,若不是则进一步获取信息
1 | /* 在buf中填充文件结构相关信息,成功时返回0,失败返回-1 */ |
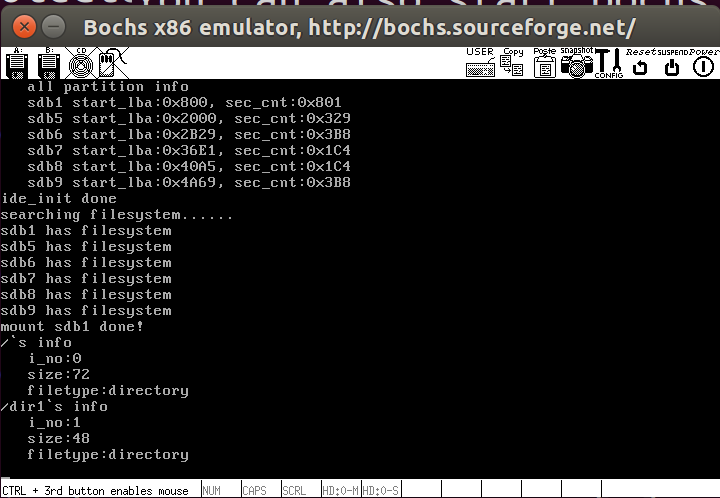
接下来在main中测试,分别获取根目录和/dir目录的信息
1 | int main(void) { |
测试结果如下
系统交互
fork的原理
fork原型是pid_t fork(void),我们首先测试一段代码,观察其性质
1 |
|
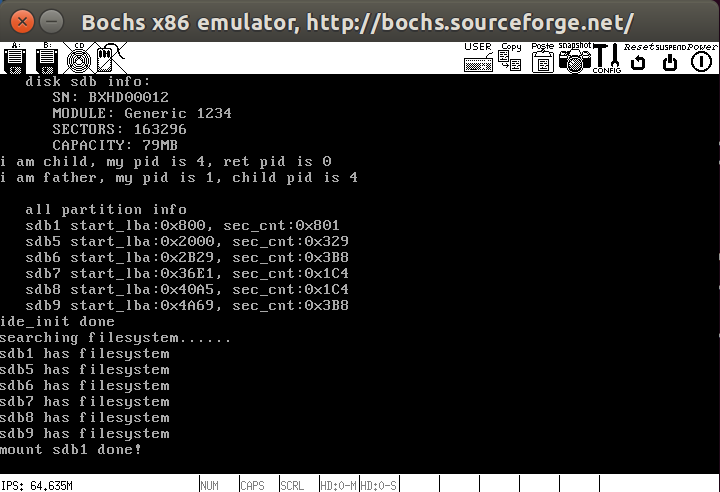
下面是与运行结果,你会发现if和else分支都执行了
1 | I am father, my pid is 103461 |
fork的作用是克隆进程,它有三个返回值
- 该进程为父进程时,返回子进程的pid
- 该进程为子进程时,返回0
- fork执行失败,返回-1
进程是运行的程序,比如程序a运行变成了进程a,同时又加载了一次程序a到内存,就有两个一模一样的程序体,但用户输入不同,就会有不同的执行分支。总结来说fork就是克隆进程,克隆的进程称为子进程,和父进程的区别就是子进程是在fork返回之后开始执行的,上例fork之后子进程和父进程的下一个执行语句都为if (pid == -1)
fork的实现
fork就是把某个进程的全部资源复制了一份,然后让处理器的cs:eip寄存器指向新进程的指令部分,故fork需要先复制资源,然后跳过去执行,复制的资源包括
- 进程的PCB
- 程序体
- 用户栈
- 内核栈
- 虚拟地址池
- 页表
克隆进程的执行只需要将其放入就绪队列即可,下面是一些拷贝操作
1 | /* 将父进程的pcb、虚拟地址位图拷贝给子进程 */ |
父进程调用fork时会进入内核态进行系统调用,中断入口程序会保存父进程的上下文和cs:ip,因此才会正常返回执行后面的代码,子进程要从fork后开始执行,就需要和父进程一样从中断退出,经过intr_exit,下面是具体实现部分
1 | /* 为子进程构建thread_stack和修改返回值 */ |
下面我们添加fork系统调用和init进程初始化,init是用户级进程,是第一个启用的程序,其pid为1,也就是所有进程的父进程。fork系统调用的实现步骤如下
- 在syscall.h中添加系统调用号SYS_FORK
- 在syscall.c中添加fork(),原型是
pid_t fork(void) - 在syscall-init.c中的函数syscall_init中添加初始化
下面是main.c中添加init进程代码
1 | /* init进程 */ |
为了争夺pid为1的进程,我们需要修改thread.c中的代码,在创建主线程之前就创建init进程
1 | /* 初始化线程环境 */ |
编译测试效果如下
添加read、putchar、clear系统调用
下面添加一些其他系统调用,因为在后面shell交互的时候我们需要知道用户的输入,所以我们首先添加read系统调用,我们先修改sys_read让其支持键盘,后面几步就是添加read原型ssize_t read(int fd, void *buf, size_t count),添加系统调用
1 | /* 从文件描述符fd指向的文件中读取count个字节到buf,若成功则返回读出的字节数,到文件尾则返回-1 */ |
下面是putchar和clear的函数,其中putchar原型是int putchar(int c),我们可以直接用现有的console_put_char函数。对于clear操作,涉及到清屏,就需要用汇编实现,具体内容在print.S中,如下所示
1 | global cls_screen |
下面是系统调用的添加,后面的一些操作和上面类似,就不具体列出了
1 | /* 输出一个字符 */ |
shell的实现
接下来我们需要实现shell,支持一些简单的命令,和之前的代码联系起来,我们的shell实现新建一个shell目录,用shell.c和.h进行具体实现,其中比较关键的函数是readline,主要通过循环一个字符一个字符读取到pos中,然后进行判断处理
1 |
|
下面在main中测试一下
1 | int main(void) { |
结果如下,实现了一个简单的终端,还没有实现交互
添加ctrl+u和ctrl+l
Linux中ctrl+u作用是清除本次输入,相当于连续退格。ctrl+l相当于clear命令清屏,不过不会清除当前终端正在输入的内容。我们在shell中继续添加代码,其中ctrl+l分四步完成
1 | /* 从键盘缓冲区中最多读入count个字节到buf。*/ |
解析键入字符
接下来我们需要读入shell中输入的字符,实现交互cmd_parse将解析出来的命令指针存如argv数组,然后通过循环进行下一步处理
1 | /* 分析字符串cmd_str中以token为分隔符的单词,将各单词的指针存入argv数组 */ |
下面测试一下,可以正常处理字符串
添加系统调用
下面添加一大堆系统调用,实现shell交互,首先添加系统调用
1 |
|
然后增加系统调用实现
1 | /* 获取当前工作目录 */ |
然后在syscall_table中注册
1 | /* 初始化系统调用 */ |
其中命令ps在thread中的实现核心sys_ps如下
1 | /* 打印任务列表 */ |
路径解析
绝对路径是当前文件的全路径,相对路径是以当前工作路径为基础进行操作。要判断这两个路径最好的方法就是判断输入路径,若输入路径以根目录的”/“开头则认为是相对路径,路径解析主要把路径中的”..”和”.”替换成实际的目录,将用户键入的路径,无论是绝对路径还是相对路径,一律转换成不含”.”和”..”的绝对路径进行2操作
1 | /* 将路径old_abs_path中的..和.转换为实际路径后存入new_abs_path */ |
上面的代码我们就先不测试了,待会一起进行测试,接下来我们继续完善ls,cd,mkdir,ps,rm等命令,我们采用内部函数的方法对其进行实现,遵循以下几点
- 内部命令都以
buildin_ + 命令名组合 - 形参均为argc和argv,argc是参数数组argv中参数的个数
- 函数实现是调用同功能的系统调用实现的
- 系统调用前调用make_clear_abs_path将路径转换为绝对路径
1 | /* pwd命令的内建函数 */ |
调用这些命令就需要修改shell文件,因为这个文件能够获取用户的输入,下面的argv[0]也就是用户输入的命令,通过memset进行比较
1 | char* argv[MAX_ARG_NR]; // argv为全局变量,为了以后exec的程序可访问参数 |
下面测试一下
加载用户进程
接下来我们需要从硬盘上加载程序,实现exec,exec会把一个可执行文件的绝对路径作为参数,把当前正在运行的用户进程的进程体(代码段、数据段、堆、栈)用该可执行文件的进程体替换,从而实现了新进程的执行,新进程只会替换老进程,因此pid仍然是老进程的pid,之前的shell是通过if-else结构对用户输入进行处理,要添加系统调用就会很麻烦,但有了exec之后就可以完成任意外部命令(用户进程)的运行。下面是具体实现,首先添加elf相关结构体
1 | extern void intr_exit(void); |
先实现段加载到内存的函数
1 | /* 将文件描述符fd指向的文件中,偏移为offset,大小为filesz的段加载到虚拟地址为vaddr的内存 */ |
把段内存分配完之后就是加载进程到内存中
1 | /* 从文件系统上加载用户程序pathname,成功则返回程序的起始地址,否则返回-1 */ |
最后就是sys_execv函数,用path指向的程序替换当前进程
1 | /* 用path指向的程序替换当前进程 */ |
让shell支持外部命令
由于有系统调用exec,我们shell中就可以添加外部调用命令,Linux中执行命令是bash(或其他shell)先fork一个子进程,然后调用exec去执行命令。我们也效仿这种方式
1 | [...] |
加载硬盘上的用户程序执行
接下来我们需要实现让用户程序跑起来,有下面几步
- 编写第一个真正的用户程序
- 将用户程序写入文件系统
- 在shell中执行用户程序,即外部命令
首先实现用户程序
1 |
|
然后编写编译脚本
1 | #### 此脚本应该在command目录下执行 |
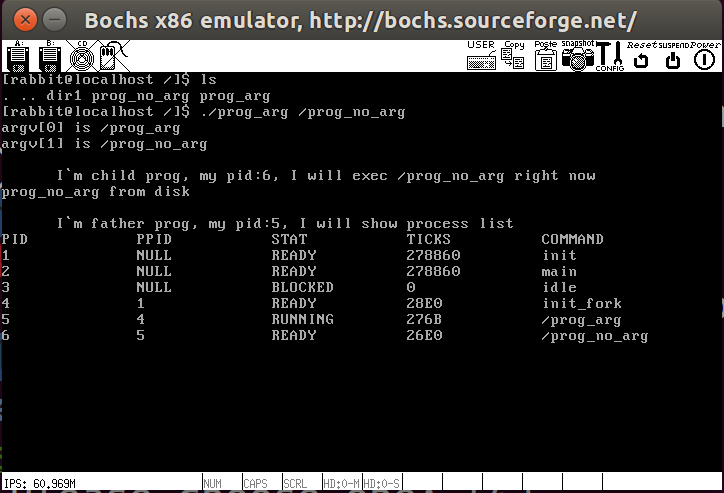
最后在main中测试,加载用户程序
1 | int main(void) { |
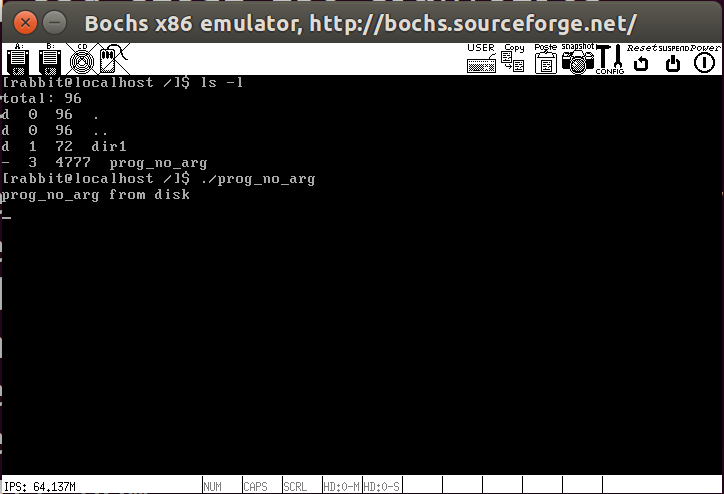
先编译kernel,在编译compile.sh,成功加载用户程序
支持参数的用户程序
下面我们需要增加参数,也就是多一个传参的过程,但是我们这里传的参数是来自用户程序的,这就要涉及到CRT相关知识点了,在main函数执行前有很多初始化工作,比如start之类的函数,其中很流行的一个框架就是C运行时库也就是CRT,由它来调用main函数并传递参数,如下图所示
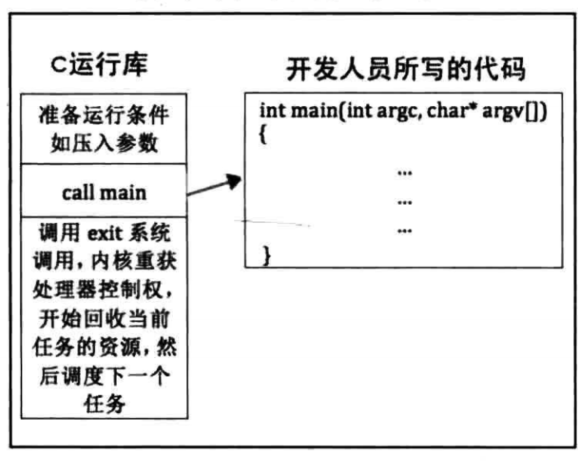
我们要传递来自用户的参数,就需要自己实现一个简单的”CRT”,下面是一个很简单的例子,就是单纯传递main的参数
1 | [bits 32] |
然后我们测试程序prog_arg.c如下
1 |
|
编译脚本
1 | #### 此脚本应该在command目录下执行 |
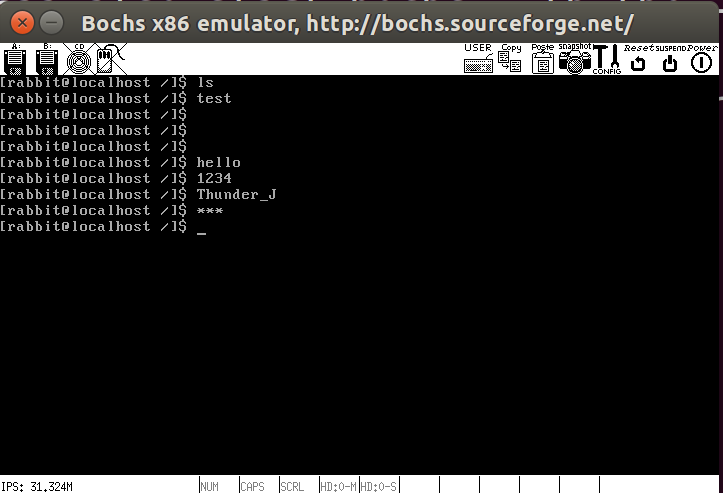
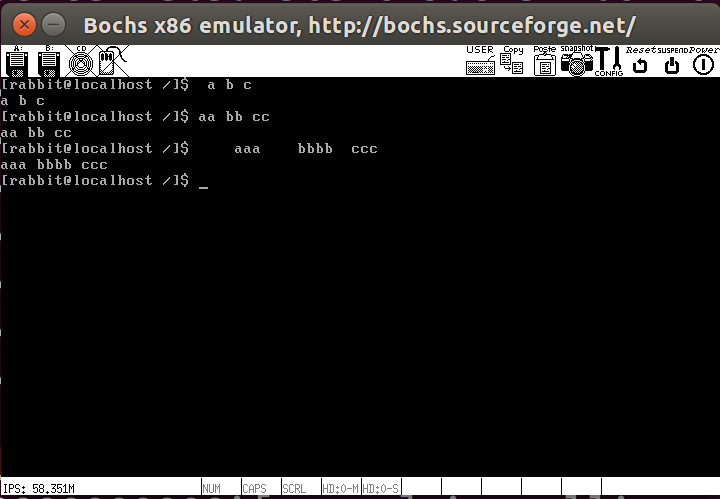
最后测试一下效果
实现wait和exit
exit作用就是结束进程,wait作用是阻塞父进程自己,直到子进程结束运行,若没有子进程则返回-1,若有则遍历找到其子进程然后等待子进程退出后唤醒父进程。exit是由子进程调用,表面上功能是使子进程结束运行并传递返回值给内核,本质上内核在幕后会将进程除pcb以外的所有资源回收。wait是父进程调用的,表面上功能是使父进程阻塞自己,直到进程调用exit结束运行,然后获得子进程返回值,本质上是内核在幕后将子进程的返回值传递给父进程并唤醒父进程,然后将子进程的pcb回收。下面是实现部分,首先是释放用户进程资源的函数
1 | /* 释放用户进程资源: |
下面是list_traversal回调三个函数,find_child功能是查找pelem的parent_pid是否是ppid,具体实现就是找父进程pid为ppid的子进程。find_hanging_child负责查找状态为TASK_HANGING的任务。init_adopt_a_child负责将一个子进程过继给init,使init作为该进程的父进程。
1 | /* list_traversal的回调函数, |
下面就是sys_wait和sys_exit的具体实现,注释比较详尽
1 | /* 等待子进程调用exit,将子进程的退出状态保存到status指向的变量. |
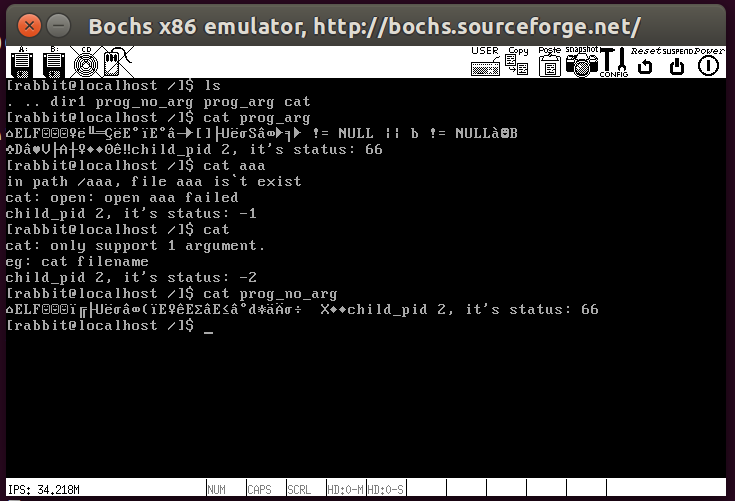
实现cat
cat负责查看文件内容,我们这里实现一个简单的cat,只支持一个参数,下面是实现,首先判断参数是否为一个,然后用malloc申请1024字节的内存用作缓冲区buf,512字节的abs_path用于存储参数的绝对路径
1 |
|
下面修改shell.c的文件,把之前的while(1)替换掉
1 | } else { // 如果是外部命令,需要从磁盘上加载 |
下面是main中测试代码,把cat写入分区sda的根目录
1 | int main(void) { |
测试结果如下
管道
管道原理
进程虽然是独立的,但有很多相互通信的例子,比如进程A传消息给进程B等,实现这种相互通信的机制有很多方法,如消息队列、共享内存、socket网络通信等,还有一种就是我们要实现的管道。Linux中一切皆文件,故管道也是文件,只是其存在于内存中,仍然可以用open、close等函数操作。管道通常被多个进程共享,其原理是所有进程在地址空间中都可以访问它,也就是内核中的内存缓冲区。
管道是数据的一个中转站,当某个进程往管道中写入数据后,该数据就会被另一个进程读取,之后用新的数据覆盖旧数据,既然是一块数据缓存区,就应该有一个大小。但是由于写入的数据大小是不确定的,这块缓存区的大小很难确定下来,一般来说会使用环形缓存区来存储数据,通过生产者消费者模型对这块环形缓冲区的数据进行读写。这个环形缓冲区用两个指针来维护,一个专门负责读,一个专门负责写,当缓冲区数据满时,生产者睡眠并唤醒消费者。缓冲区空时,消费者睡眠,唤醒生产者。
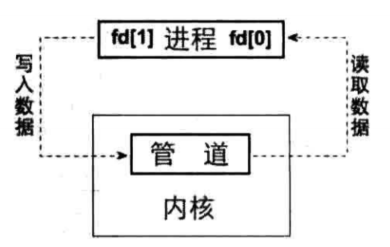
管道有两端,一端用来读,一端用来写。这个两端的概念实质上是内核为一个管道分配了两个文件描述符,一个负责写,一个负责读。它的模型如下图
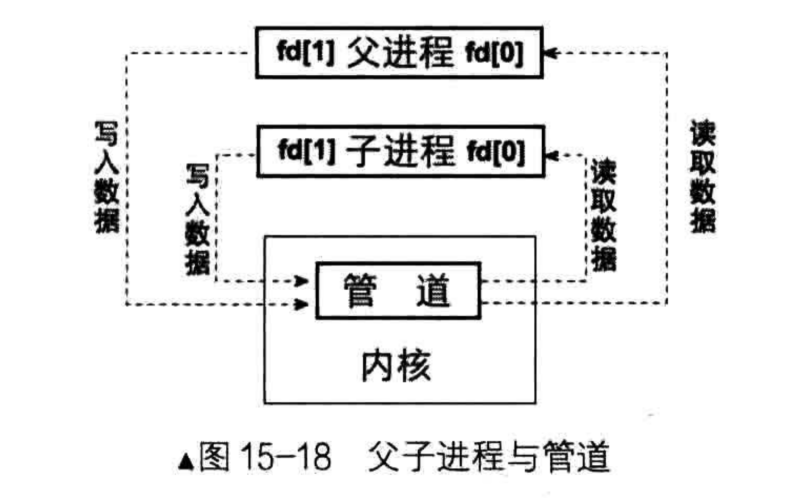
管道不可能字节读写自己,所以一般操作是创建管道之后,fork子进程,这个子进程和父进程资源一样,所以两者可以相互实现通信,如下图所示
管道分为匿名管道和命名管道,其区别就是名称,没有名称也就只能用内核返回的文件描述符访问,仅仅局限于父子进程通信。有名称就可以实现对所有进程通信。
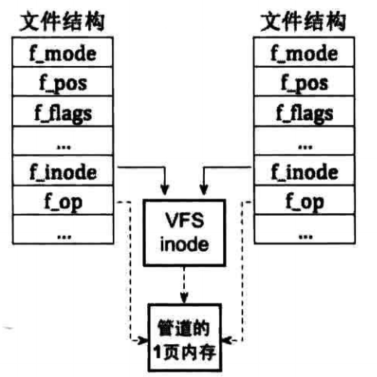
Linux为了向文件系统的上层提供统一接口,加了一层中间层VFS(virtual file system),Linux处理管道时是利用现有的文件结构和VFS中inode共同完成的,并没有为管道提供另外的数据结构。如下图所示,文件结构中的f_indoe指向VFS的inode,该inode指向一个页框大小的内存区域,该区域用于存储管道的数据,也就是说Linux的管道大小是4096字节
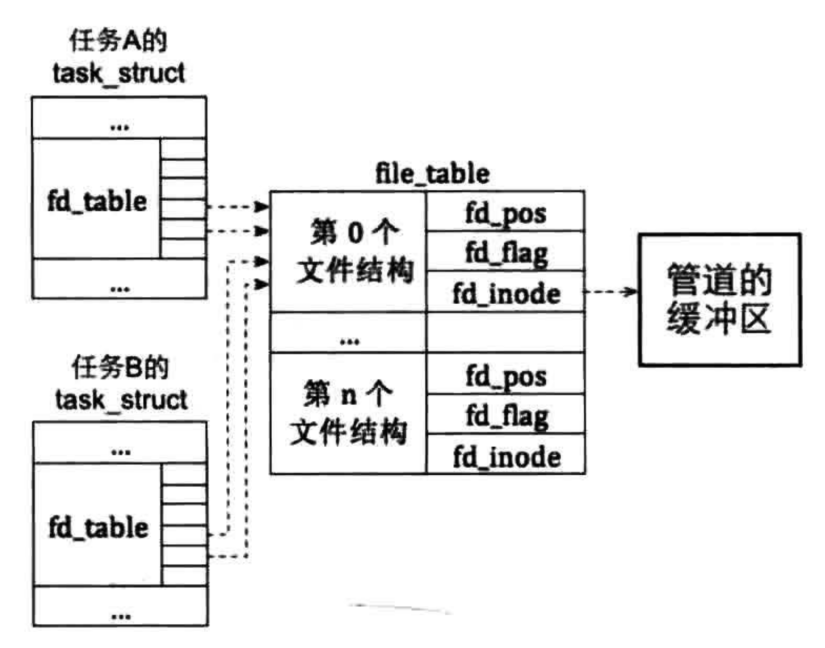
我们的管道设计图如下
管道实现
Linux创建管道方法是系统调用pipe,原型是int pipe(int pipefd[2]),成功返回0,失败返回-1,其中pipefd[2]是长度为2的整型数组,用于存储系统返回的文件描述符,fd[0]用于读取管道,fd[1]用于写入管道。下面是创建管道
1 | /* 判断文件描述符local_fd是否是管道 */ |
读取管道中数据,从文件描述符fd中读取count字节到buf
1 | /* 从管道中读数据 */ |
向管道中写入数据,把缓冲区buf中的count个字节写入管道对应的文件描述符fd
1 | /* 往管道中写数据 */ |
下面是利用管道实现进程间通信的代码,下面就不测试了,直接最后一起测试
1 |
|
接下来我们需要在shell中支持管道命令,管道命令如下
1 | ps -ef | grep xxx |
管道之所以可以这样使用,是进行了输入输出重定向。通常情况下键盘是输入,屏幕是输入。这就是标准输入与标准输出。而输入输出重定向就是改变输入输出的位置,比如从文件中读取输入称为输入重定向,将结果输出到文件中称为输出重定向。管道的作用就是利用了输入输出重定向的与原理,将一个命令的输出作为另一个命令的输入来使用。管道符左边命令的输出数据会作为右边命令的输入数据使用。实现的时候就需要把旧的文件描述符替换为新的文件描述符,如下所示
1 | /* 将文件描述符old_local_fd重定向为new_local_fd */ |
下面是shell中增加的代码
1 | /* 执行命令 */ |
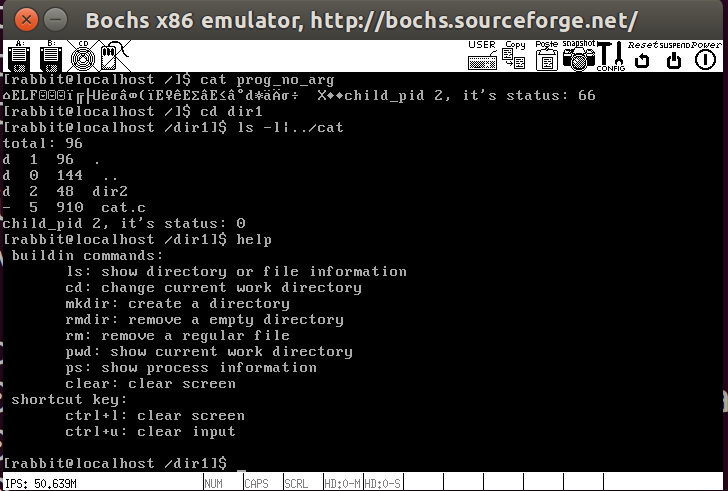
最后增加一个help功能
1 | /* 显示系统支持的内部命令 */ |
我们测试一下
所有代码我打包在了 -> 这里